Being titled as one of the most versatile free contact form plugins makes Contact Form 7 consistently exploited by spammers. It’s extremely common for users to find their mailboxes clogged with a massive amount of junk emails submitted through Contact Form 7.
To tackle that thorny issue, several methods have been brought forward, which the reCAPTCHA option is highly recommended as a simple yet effective solution.
In this article, we will show you 4 easy steps to add reCAPTCHA to Contact Form 7. Before we dig into the main part, let us walk you through different versions of reCAPTCHA first!
Different Versions of reCAPTCHA
reCAPTCHA refers to a proven “bot” detection method developed by Google, aiming to differentiate between human and bot access to websites. It’s created to remove the difficulty of solving a traditional CAPTCHA.
Basically, there are three types of reCAPTCHA: reCAPTCHA v1, reCAPTCHA v2, and reCAPTCHA v3. Because reCAPTCHA v1 has been shut down since March 2018, in this article, we will discuss reCAPTCHA v2 and reCAPTCHA v3 only.
reCAPTCHA v2
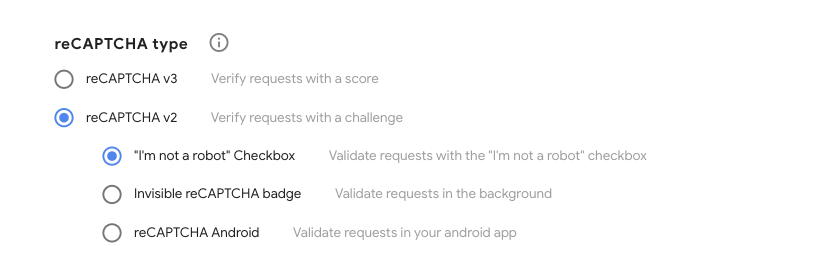
The image above shows you many versions of reCAPTCHA v2.
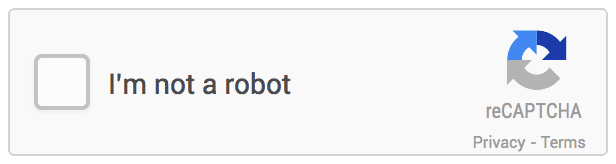
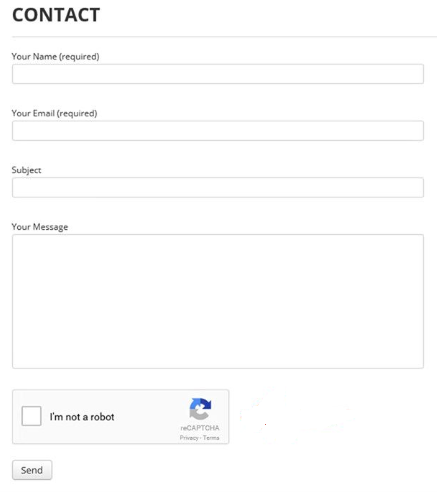
With the “I’m not a robot” checkbox version, users are required to check in the checkbox to prove that they’re not robots. This is the simplest option which requires only two lines of HTML to render.
So how can clicking a box authenticate humanity?
The answer simply lies in the position of the checkbox. Bots will click exactly in the middle of the checkbox while humans will click on some other areas of it.
The second version of reCAPTCHA v2 is the invisible reCAPTCHA badge. Users are not required to tick in the checkbox. The reCAPTCHA will run as soon as visitors click on the submit button on your sites. Among these clicks, only suspicious users are asked to solve the captcha.
![]()
Lastly, the reCAPTCHA Android is quite similar to the two previous ones. The only thing setting it apart from its siblings is that it’s mainly used to protect Android applications.
reCAPTCHA v3
Unlike reCAPTCHA v2, reCAPTCHA v3 is completely invisible to web visitors. In terms of user experience, this version is way better as it doesn’t interrupt the user’s browsing flow.
reCAPTCHA v3 detects bots based on a score algorithm rating the user interaction. It will firstly monitor how suspicious an interaction is, then determine whether it’s from a human or bot. As soon as you load a page or click a button, reCAPTCHA v3 will automatically operate.
When you browse a website and see a small reCAPTCHA badge appearing at the bottom right of your screen, it means the site is reCAPTCHA v3-protected.
Since you know different versions of reCAPTCHA, it’s time to learn how to add reCAPTCHA to Contact Form 7.
How to Add reCAPTCHA to Contact Form 7
Adding reCAPTCHA to Contact Form 7 is such a piece of cake as you won’t be involved in any codes or technical terms. The whole process will take maximum 5 minutes, including the following 4 steps:
- Step 1: Get the reCAPTCHA site key and secret key
- Step 2: Integrate reCAPTCHA with Contact Form 7
- Step 3: Configure your default contact form
- Step 4: Insert the contact form in a WordPress page
Step 1: Get the reCAPTCHA Site Key and Secret Key
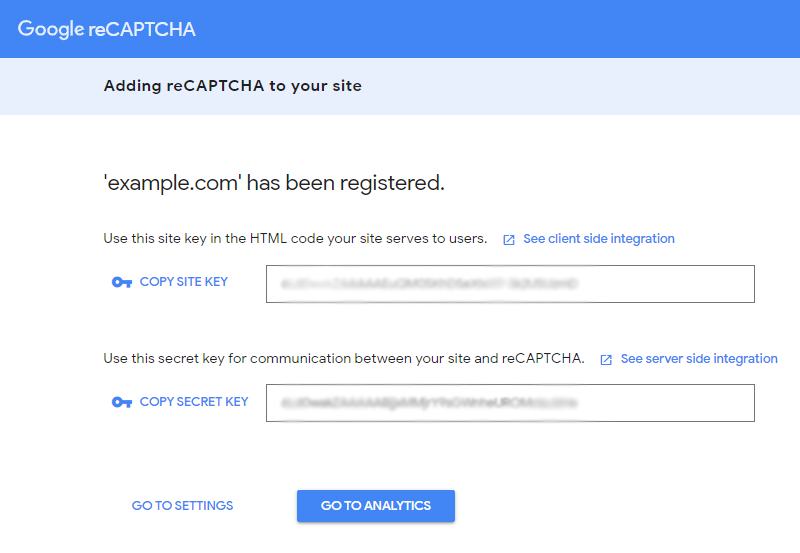
To add reCAPTCHA on your Contact Form 7, you need to have a Google account and register for an API key.
- First, log in to your Google+ account and open the Google reCAPTCHA admin page. Register your site by entering your label and domain name, choosing the reCAPTCHA type, and checking the box for the reCAPTCHA terms. Then click on the “Submit” button.
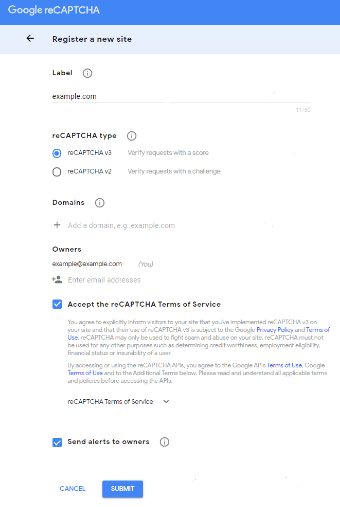
- After that, you will be taken to another page, where you get your site key and secret key. Copy them all.
Step 2: Integrate reCAPTCHA with Contact Form 7
In this step, you need to add the keys you already get from Google reCAPTCHA to your site.
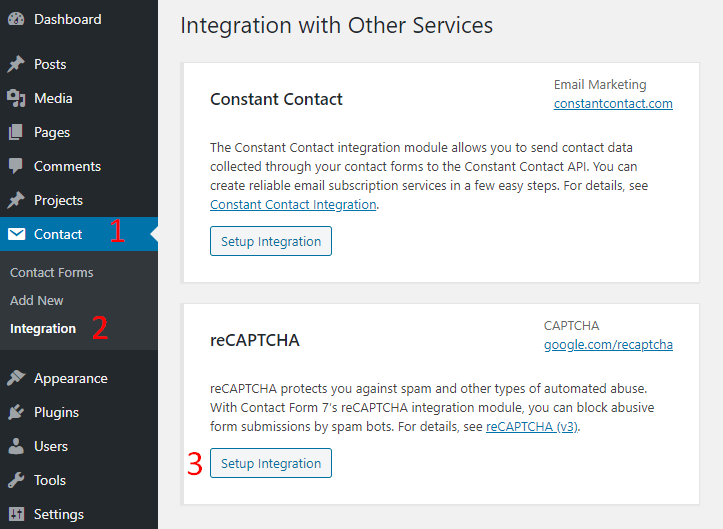
- Log in to your WordPress admin panel, in your WordPress Dashboard, navigate to “Contact,” choose “Integration.”
- Look for the “reCAPTCHA” session, press “Set up Integration.”
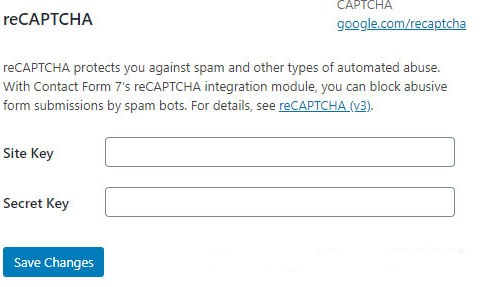
- On the next screen, you will see 2 input fields in which you have to paste the keys you’ve copied earlier. Click “Save Changes” when you’re done.
Step 3: Configure your Default Contact Form
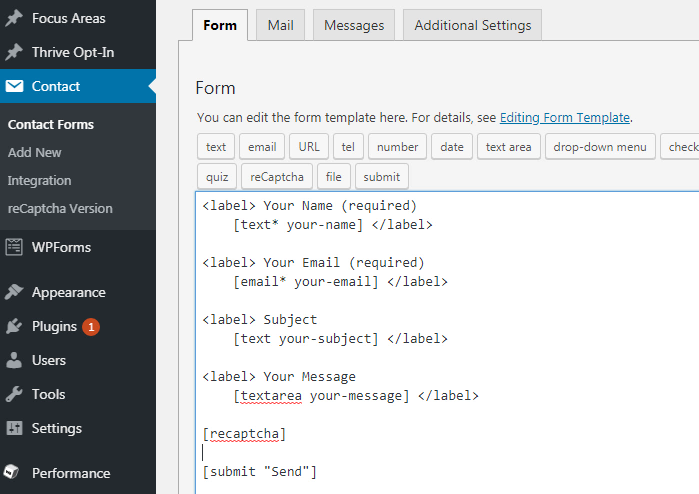
- Back to your dashboard, head to “Contact,” open the default contact form.
- Insert this shortcode [reCAPTCHA] in the “Form” tab, just above the “submit” line. Click “Save.”
Step 4: Insert the Contact Form in a WordPress Page
- Back to “Contact,” select “Contact Forms,” and copy its corresponding shortcode.

- Open a new WordPress page and paste that shortcode to your page.
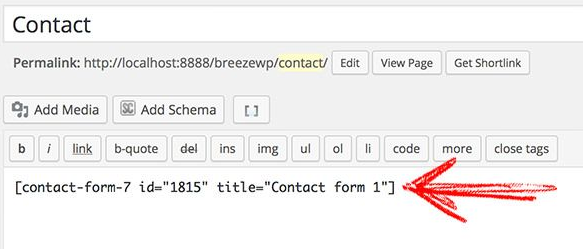
- Hit “Publish” and you should see the sign of reCAPTCHA in your form.
Note: We demonstrate the reCAPTCHA v2 for this tutorial. If you want to switch to reCAPTCHA v3, you need to register again for another pair of keys. As the reCAPTCHA v3 doesn’t need the Captcha widget to work, you won’t need the [reCAPTCHA] shortcode.
Conclusion
This article has mentioned various versions of reCAPTCHA, as well as guiding you through 4 easy steps to add reCAPTCHA to Contact Form 7. Among these steps, getting the API keys and integrating reCAPTCHA with Contact Form 7 are the most important.
Integrating reCAPTCHA with Contact Form 7 helps you significantly fend off abusive form submission spam and improve user experience.
In case you want to try out another efficient solution, using anti-spam plugins is worth considering as well.
Need any further assistance on this topic? Please let us know by dropping a comment below!