If you’re building a website using WordPress, a live WordPress website can’t be complete without it can’t be without a navigation menu. It plays a vital role in helping you get high search rankings and retain visitors on site.
And if your site requires users to log in, like a forum or a membership site, then you may need to create a dynamic menu. It intends to display different menu items to visitors when they are logged out, logged in, or have a specific user role.
For example, you might want to show logged-in users a link to their profile. Or display a link to sign in or register for users who are not logged in.
But the question is, how can you do that? This article is going to give you an in-depth guide on how to show different menus when logged in to WordPress.
Let’s find out together!
- Why Should You Create a Dynamic Navigation Menu?
- #1 Creating Dynamic Menu by Using a Plugin
- #2 Creating Dynamic Menu by Adding Code
Why Should You Create a Dynamic Navigation Menu?
It’s extremely important to have intuitive and well-organized menus that ease your users’ way to discover what they need on your site. Organizing and structuring your menu thoroughly is a must as it should work like a guide for your site.
In other words, it should navigate visitors to the content they’re looking for.
For making your site successful, it is necessary to have a dynamic menu. Especially on websites that ask people for login, the menu you show to logged-in and logged-out users should be different.
That way, you can ensure that non-logged-in users can’t see your content and must go to log in. Whereas, successfully logged-in users will be redirected to their desired content.
Also, a dynamic menu provides a clear indication and makes your site user-friendly. Logged-in and unlogged-in visitors will be easily navigated to different menu items without any confusion.
With all these points, it is now clear how important a dynamic menu is for a website. Now, it’s time to learn about how to set up a dynamic menu to show different menus when logged in to WordPress.
2 Ways to Show Different Menus When Logged in WordPress
There are 2 major methods to establish multiple menus at the same place on your WordPress site: using a plugin or adding code.
#1 Creating Dynamic Menu by Using a Plugin
The simplest way to show different menus when logged in to WordPress is to utilize a plugin. However, it may be difficult to choose the most suitable custom menu plugin among tons of available solutions nowadays.
To make it easier for you, we highly recommend using the User Menus plugin. This can be considered the perfect plugin for websites that have logged-in users.

Key Features:
- Control who can see each menu item, such as everyone, logged-out users, logged-in users, and specific user roles.
- Display user information when they’re logged in to your site. For example, “Hello, Annie.”
- Add log-in, register, and log-out links to your menu.
After you’ve installed and activated the plugin in WordPress, take the following steps to apply visibility controls to menu items:
- In your WordPress admin dashboard, navigate to Appearance → Menus.
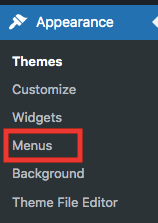
2. Add a new item to your menu or expand the existing menu item.
3. In the Who can see this link? dropdown, select either Everyone, Logged Out Users, or Logged In Users.
If you don’t make any changes, the default will be set to Everyone.
Choose Logged In Users. Then you will be able to determine which user roles can see the menu item. It allows you to restrict the menu item to a certain user role(s) only.
4. Once you’ve applied your desired visibility controls to your menu, press the Save Menu button.
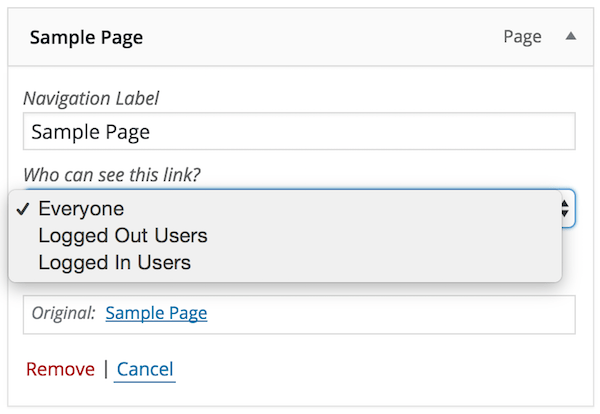
In case you select Logged In Users, follow the guide below to display their information after they’ve successfully logged in to your site:
- Head over to the Navigation Label field and click on the gray arrow.
- Define the user information you want to show in the menu item. For example, {first_name}, {last_name}, {username}, {display_name}, {nickname}, {email}.
- Press the Save Menu button. Now when a user logs into your site, they will see their information in the navigation menu.
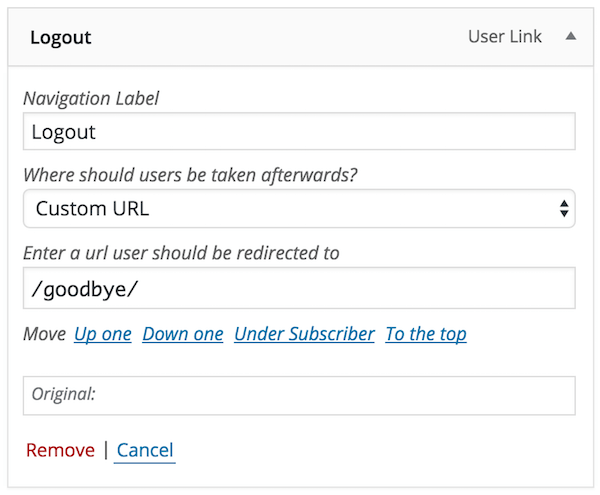
The final thing you need to add to your menu are links for users to log in and log out of your website. To add this feature to your website:
- Go to your admin dashboard, and click Appearance → Menus.
- In the Add menu items accordion, click User Links to expand the menu item.
- Tick the checkbox for Login and Logout links and select Add to Menu.
- Navigate to the Where should users be taken afterwards? field, dropdown, and select either Current Page, Home Page or Custom URL.
If you don’t make any changes, the Current Page will be the default option.
If you select Custom URL, you will then need to enter a URL that users will be redirected to.
5. Click the Save Menu button to finish.
#2 Creating Dynamic Menu by Adding Code
The second way to show different menus when logged in WordPress is manually adding code to the functions.php file:
- In the admin dashboard, go to Appearance → Menus.
- In the Add menu items, select the checkbox Login and Log Out.
- Click Add to Menu to create 2 logged-in and logged-out menus.
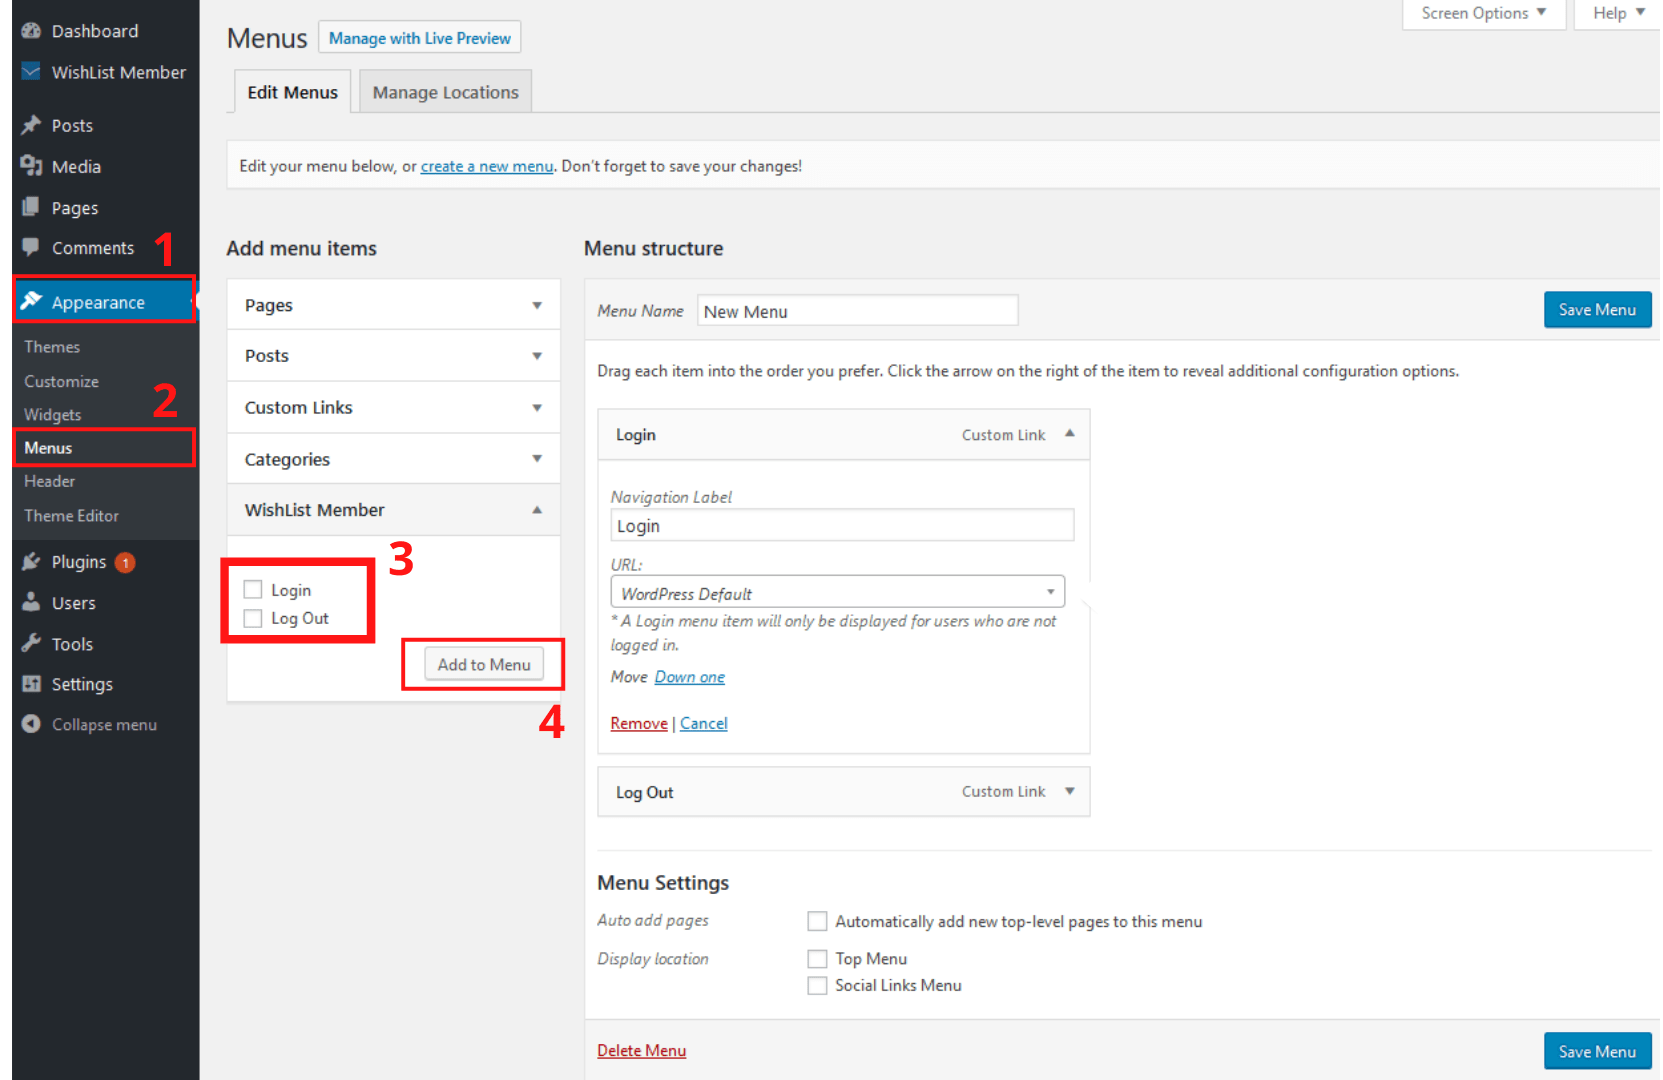
4. Navigate to the dashboard and click Appearance → Theme Editor.
5. In the Theme Files section, choose functions.php and then add the code below to the file:
function my_wp_nav_menu_args( $args = '' ) {
if( is_user_logged_in() ) {
$args['menu'] = 'logged-in';
} else {
$args['menu'] = 'logged-out';
}
return $args;
}
add_filter( 'wp_nav_menu_args', 'my_wp_nav_menu_args' );
That’s all. Now your logged-in visitors will see the logged-in menu and non-registered or logged-out users will see a different menu.
This technique allows you to establish two different menus for your WordPress website. That way, you can freely update your menus for logged-in or logged-out users at any time.
Ready to Show Different Menu When Logged in WordPress!
This article has demonstrated 2 simple ways to show different menus when logged in WordPress: using a plugin and adding code to the functions.php file.
Customizing WordPress menus for logged-in and unlogged-in users is just a piece of cake. Don’t wait any longer. Let’s get started now!
You’ve learned how to customize the logged-in and logged-out menus. You may be interested in how to customize a login form.