The thought of establishing your own website may seem overwhelming. You might even think this task is out of reach for anyone but a developer.
But this is no longer the case. Some software is so simple to use, virtually anyone can create a unique and professional-looking website for their businesses, blogs, or portfolios. It’s called WordPress.
Designed with usability and flexibility in mind, WordPress has become the easiest and most powerful website builder in existence nowadays. It powers 43% of websites on the Internet, and that number continues to rise dramatically over time.
Although a lot of people use WordPress, not everyone knows all the unique features that it offers. Today, we’re going to dive deeply into 10 extraordinary WordPress features that you may overlook.
- #1 Send Password Reset Quick Link to Users via Email
- #2 Work with Reusable Blocks
- #3 Edit Items in Menus by Screen Options
- #4 Reorder Posts
- #5 Preview Themes without Activating Them
- #6 Save Favorite Themes and Plugins
- #7 Split a Single Post into Multiple Pages
- #8 Automatically Block Comments
- #9 Remove Writing Distraction
- #10 Upgrade Site from HTTP to HTTPS
#1 Send Password Reset Quick Link to Users via Email
WordPress 5.7 launches a new feature that allows website administrators to manually send a password reset link to the existing users. This can be useful when users forget their passwords and cannot use the lost password link for any reason.
Please notice that this feature does not directly change the user’s password. It sends them a password reset link via email so that they can reset the password on their own. Sending a password reset link is safer than directly changing the password for the user, as passwords should not be communicated directly.
Take the following steps to send password reset links to your users:
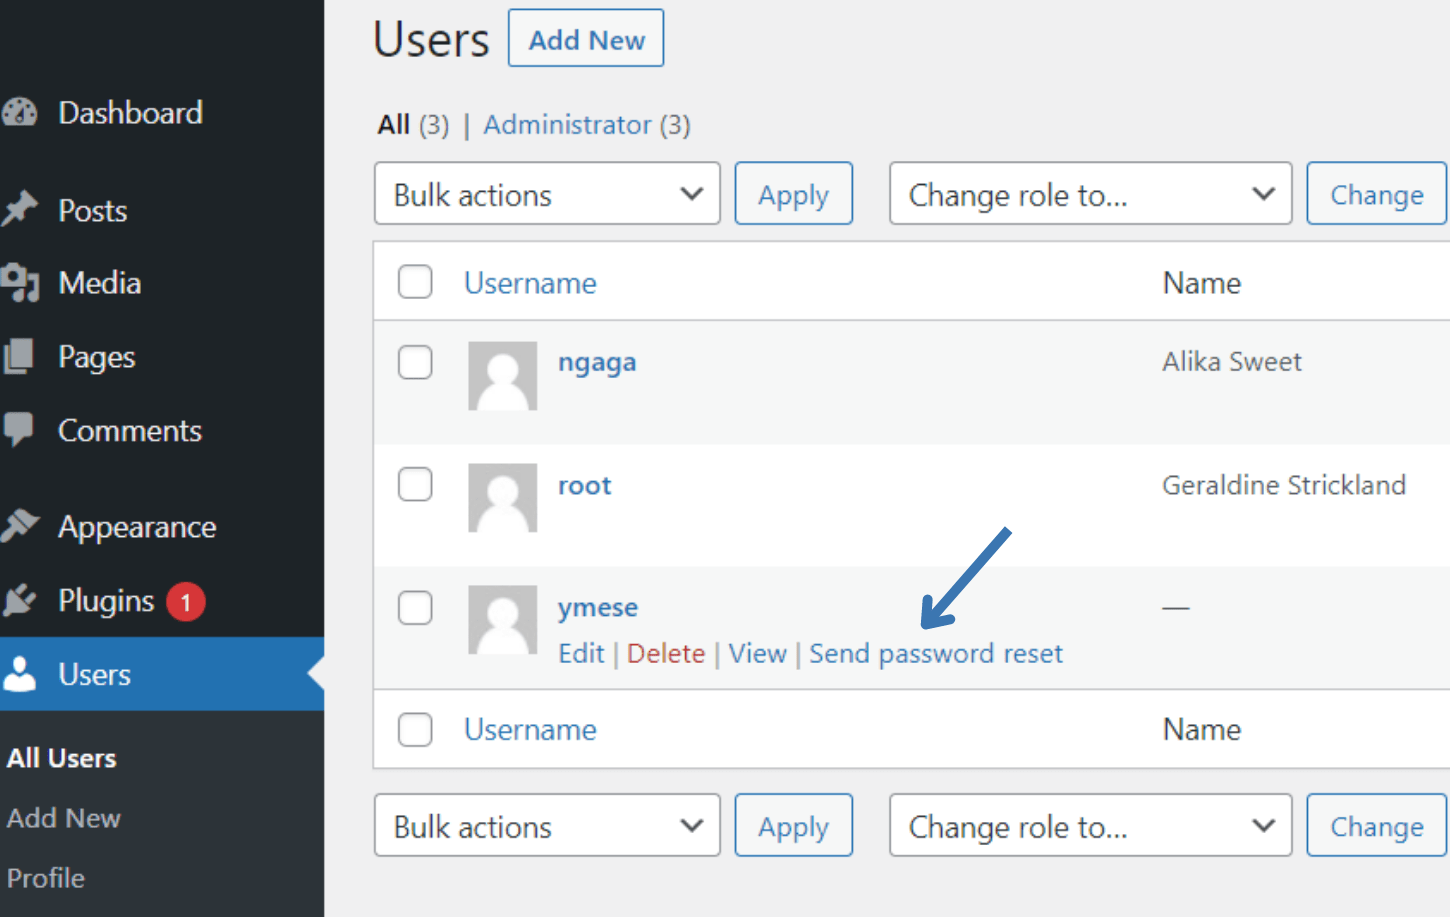
- In your WordPress admin dashboard, head to Users → All Users.
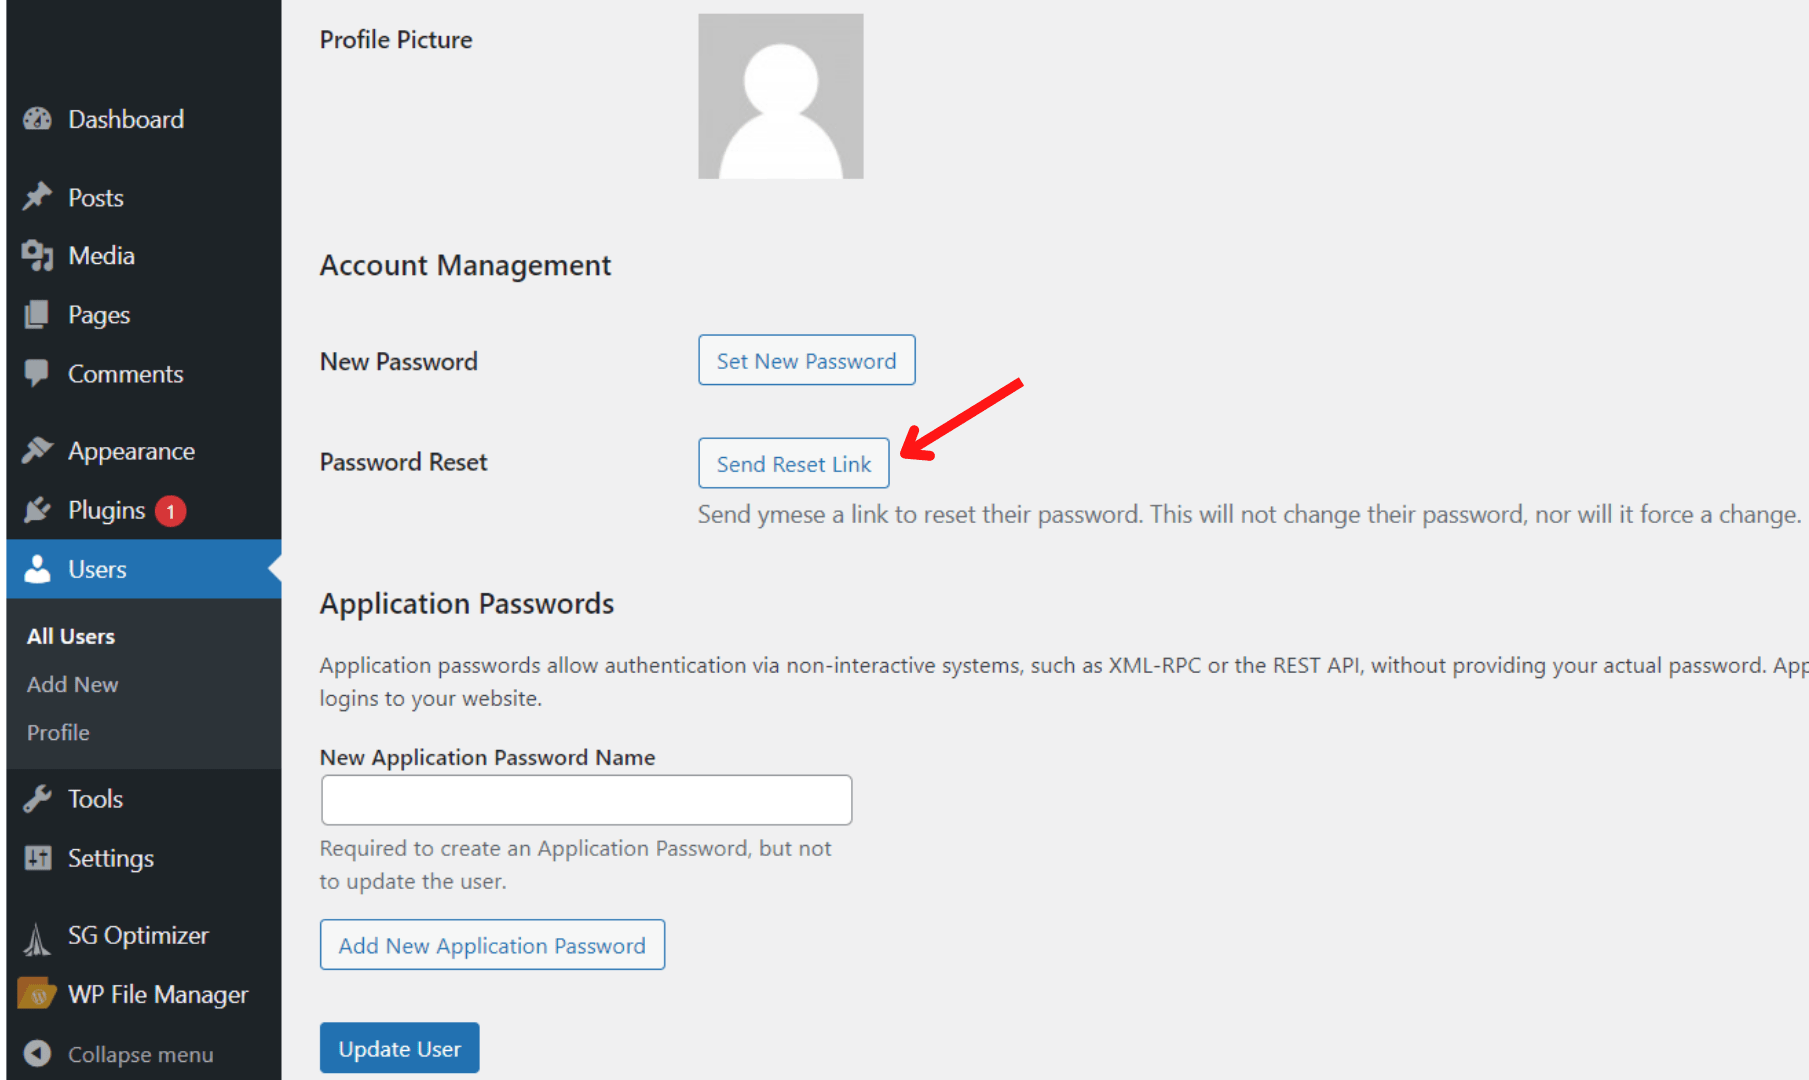
- Click Send password reset beneath the username or press the Send Reset Link button in the user’s profile.
#2 Work with Reusable Blocks
Reusable blocks can save a lot of time in the way you compose your content. Your most frequently-used blocks and their settings can be stored in a special library for repeated use in the future.
If you often use identical snippets of content, this WordPress feature is going to become one of your best friends.
Create: To create a new reusable block:
- Choose the block you’ll want to reuse.
- Click on the three dots that appear in the toolbar.
- Select Add to Reusable blocks.
- Enter its name.
- Press Publish and then Save.
Add: To add a reusable block that you have already created to your content:
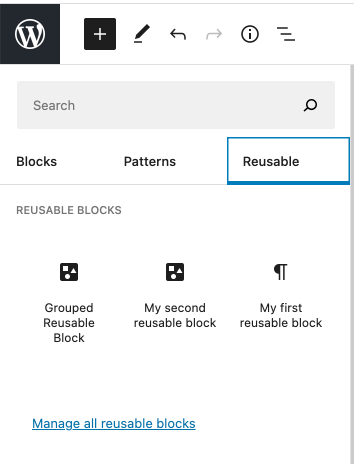
- Click on the + Block Inserter icon and go to the Reusable tab.
- Select the block to add it to your post or page. Or you can drag and drop blocks directly to your post or page editor.
Edit: To edit the reusable blocks, simply click on the Edit button that’s on the block. But be careful. When you make edits to a reusable block, it will automatically change the way the block appears in all locations where you’ve used it.
If you only want to make changes on one single page or post, you’ll first need to convert it to a regular block. That way, you can edit that block without impacting other posts and pages. To do this:
- Pick the block you want to edit.
- Select the three dots that appear in the toolbar.
- Choose the Convert to Regular Block option from the menu.
Delete: To eliminate a reusable block:
- Click on the + Block Inserter icon and navigate to the Reusable tab.
- Select Manage all reusable blocks.
- Choose the Trash option under the block’s name.
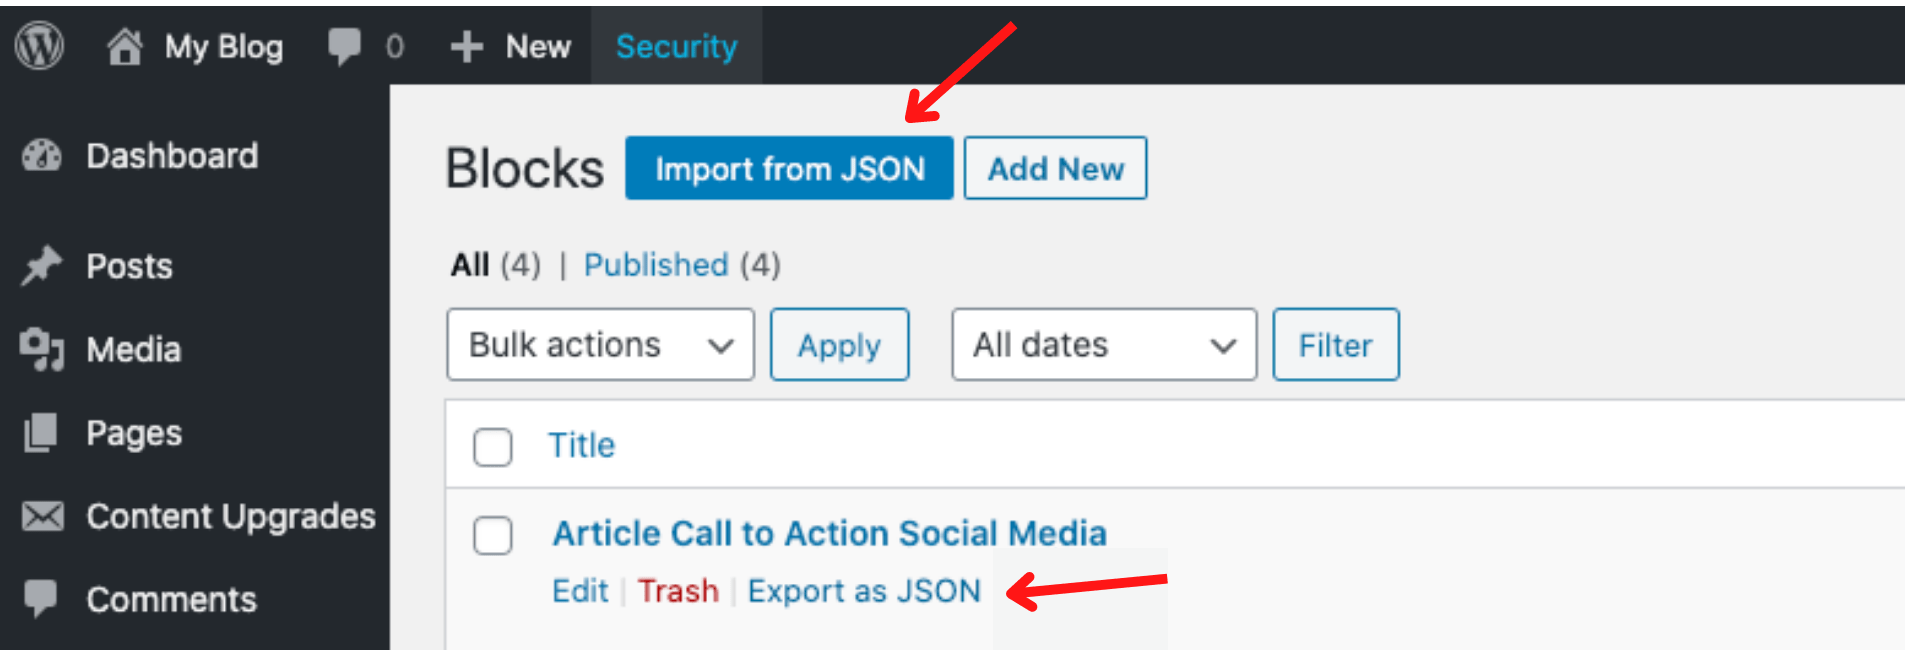
Import/Export: What’s more, if you work on multiple WordPress sites, reusable blocks can be exported from one site and used on the others. To import a reusable block:
- Go to Manage all reusable blocks.
- Click Export as JSON. Then WordPress will send it in the form of a JSON file.
To export a reusable block:
- Go to Manage all reusable blocks.
- Press the Import as JSON button.
- A file upload box will appear. Select Choose File and choose the JSON file of the block you downloaded from the other site you manage.
- Click Import.
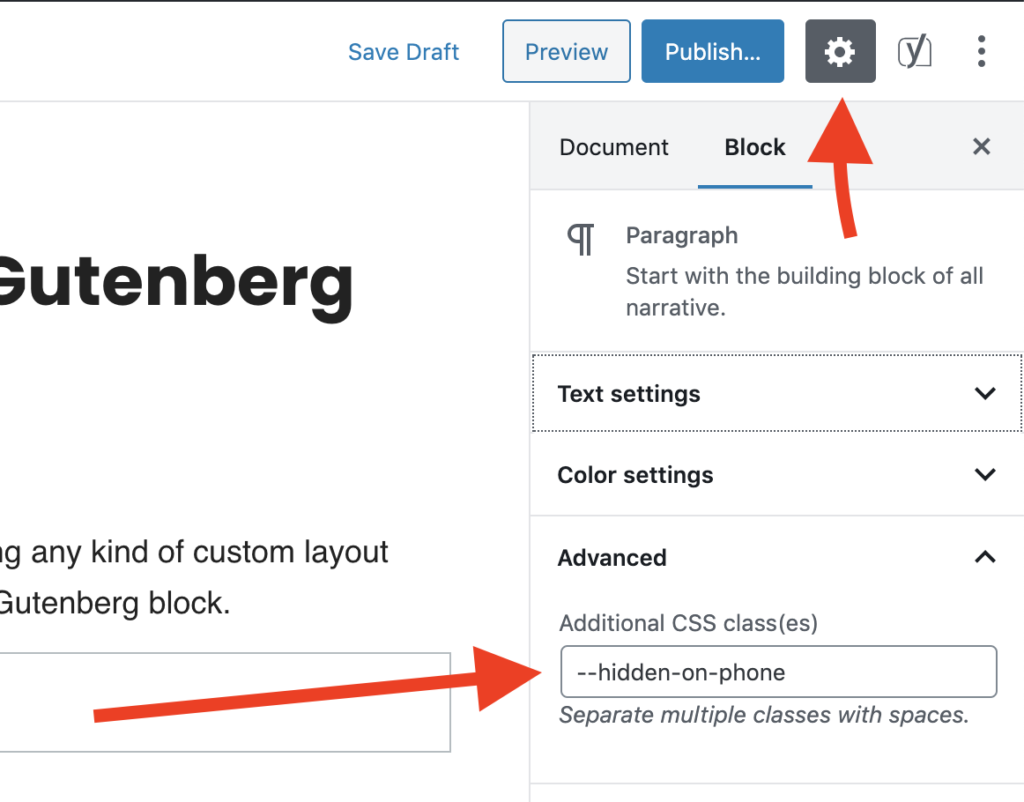
Customize: What if you’d like to customize your reusable blocks. For example, you might want to wrap them with a specific border that fits the style of your site. To do this:
- On the right-hand sidebar of a block, go under the Advanced area.
- In the Additional CSS class(es) field, enter a custom class.
Remember to set the block’s CSS class before you make it reusable to save the class field for future use.
As yet another improvement to the block editor user interface, now you can drag and drop blocks directly from the inserter panel to the spot where you want them in your post or page editor.
Before that, you had to click on the block you desire to add to the editor. This makes a great upgrade for placing blocks exactly where you wish to display in your content.
#3 Edit Items in Menus by Screen Options
Another great feature is editing your menus. This WordPress feature allows you to customize the look of individual menus, submenus, and menu buttons.
Show/Hide: Follow the guide below to show/hide items in your menus:
- In the admin dashboard, head to Appearance → Menus.
- Press the Screen Options button on the top right of the screen.
- Enable/Disable the items in your menus to show/hide them.
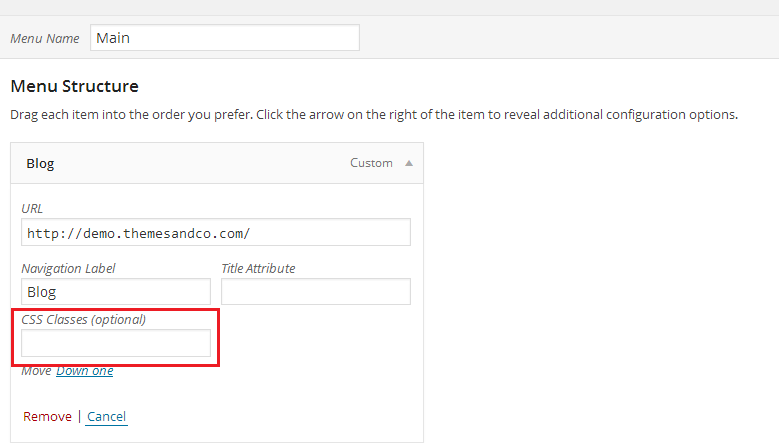
Customize: You can simply add CSS code to each item to style your menus without having to exit the edit page:
- In the Screen Options, check the CSS classes option in the Show advanced menu properties panel.
- Enter the menu name.
- In the Menu structure section, click the arrow to the right of each item.
- Add your CSS Classes.
#4 Reorder Posts
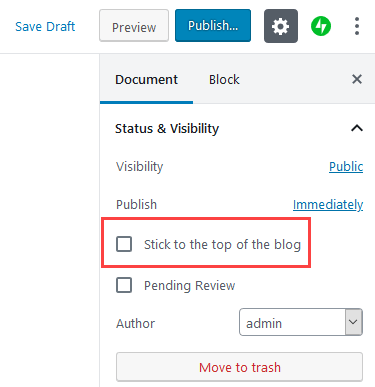
There’s one big problem that comes with sorting your blog chronologically: once a post falls off the front page, it’s going to lose a ton of traffic. Fortunately, you can pin a post on top of your blog and keep visitors flowing steadily to them forever.
To pin a post:
- Go to the edit screen of the post.
- Under Status & Visibility, check the box Stick to the top of the blog.
- Click Update to save the edit.
There is another way to reorder your post without sticking it to the top: change the publish dates. You can publish a post immediately, back date it to a past date, or even schedule it to be published in the future.
WordPress arranges and shows your posts from newest to oldest by date. Changing the publish date of an older post will push it up or down within your post lists.
To change the publish date:
- Head to the Published area on the blog post edit screen.
- Click Immediately to change the date.
- Press the Update button.

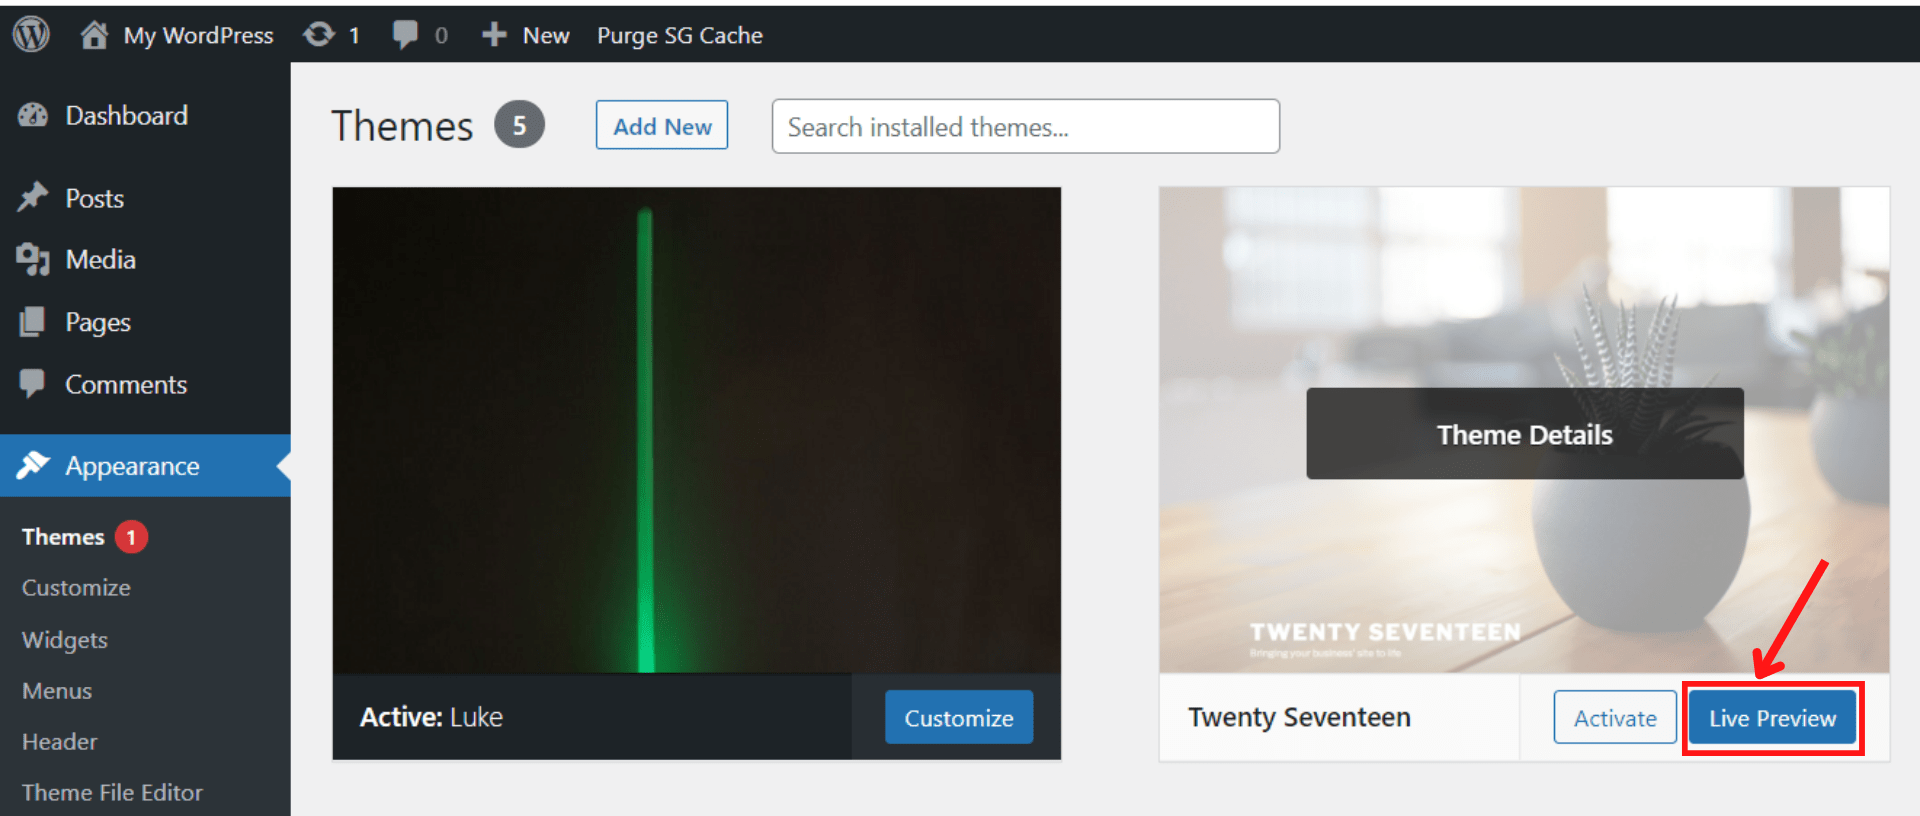
#5 Preview Themes without Activating Them
You worry that changing your WordPress theme may lead to unwanted consequences for your website. One thing you can do is to test the new theme without activating it:
- Go to Appearance → Themes in the admin menu.
- Click Add New, then choose themes and select Install.
- Once you’ve installed the themes, simply click the Live Preview button.
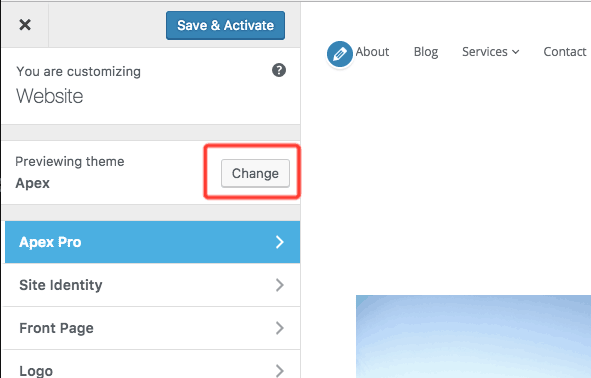
4. If you plan to preview other themes, press Change and select another theme.
#6 Save Favorite Themes and Plugins
There is a cool WordPress feature that you may not have noticed: the heart icon located beneath or near the download button of a theme or a plugin. This icon assists you in saving your favorite plugins and themes you want to find again later:
- Log in to WordPress.org.
- Search for your favorite plugins and themes.
- Click the heart icon.
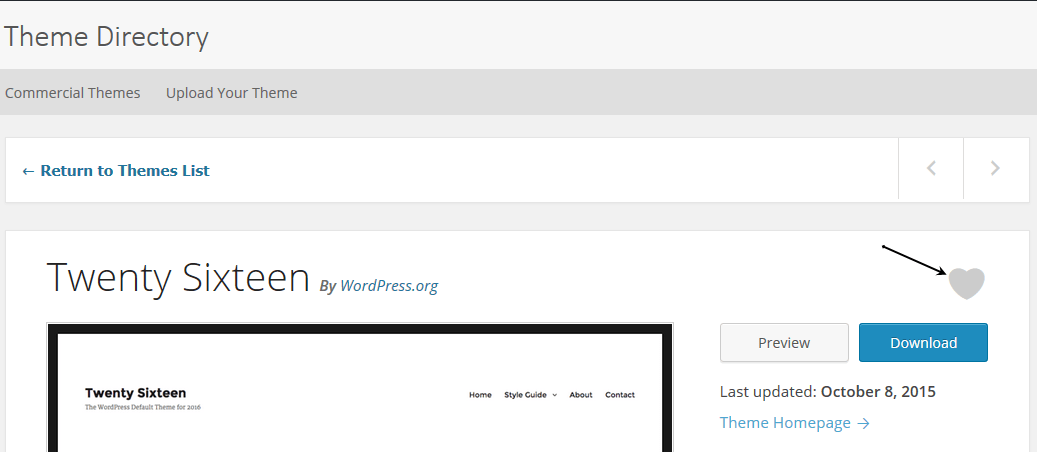
Afterward, go to your WordPress account page and you’ll see the list of them there.
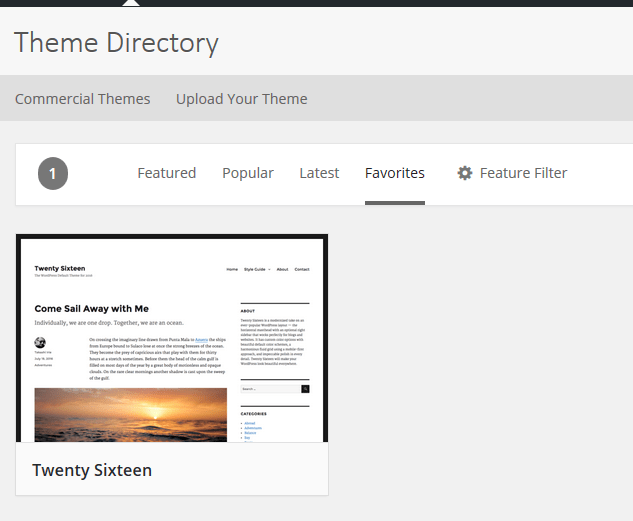
To remove themes and plugins from the favorite list, click the heart icon again.
#7 Split a Single Post into Multiple Pages
The simplest way to add pagination to a blog post is by using the Page Break block in your WordPress content editor. This WordPress feature supports splitting lengthy content into several pages. That way, you can make it easier for your visitors to read articles and navigate different sections.
To get started:
- Open your desired post.
- Select the (+) button where you intend to split your content.
- Add a Page Break block.
You can also press the Alt + Shift + P shortcuts to insert page breaks. After that, preview or publish the blog post. You will now see the post pagination at the bottom of your blog.
#8 Automatically Block Comments
Visitors’ comments can be a valuable addition to your WordPress site. It encourages people to interact and keep coming back for more.
However, there can also be a dark side to comments. Maybe your website is being flooded by spam and unwanted comments. That’s why sometimes you might want to close comments. The good thing is this feature is built right into WordPress.
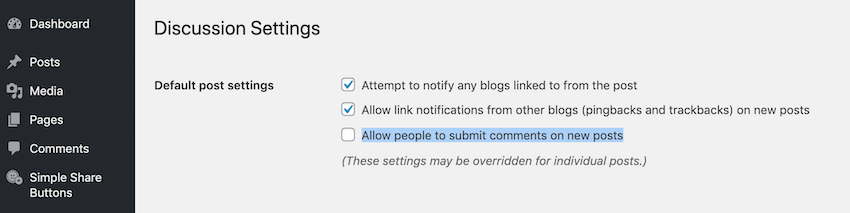
To auto-block comments on all future posts and pages:
- Navigate to Settings → Discussion from WordPress’s left-hand menu.
- Disable Allow people to submit comments on new posts.
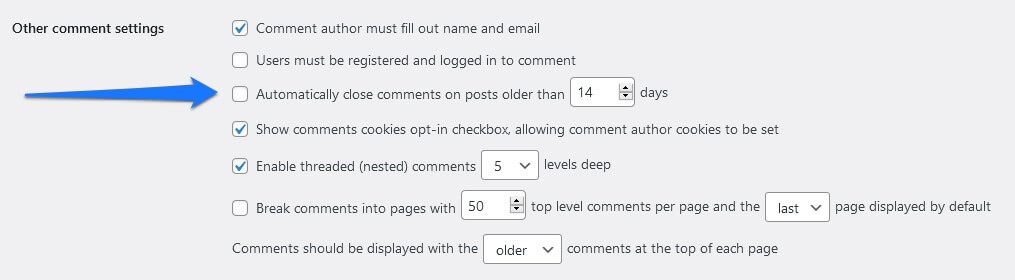
To close the comment section automatically after a certain number of days:
- Scroll to the Other comment settings section.
- Enable Automatically close comments on posts older than… days, then enter the desired number of days.
- Click Save Changes.
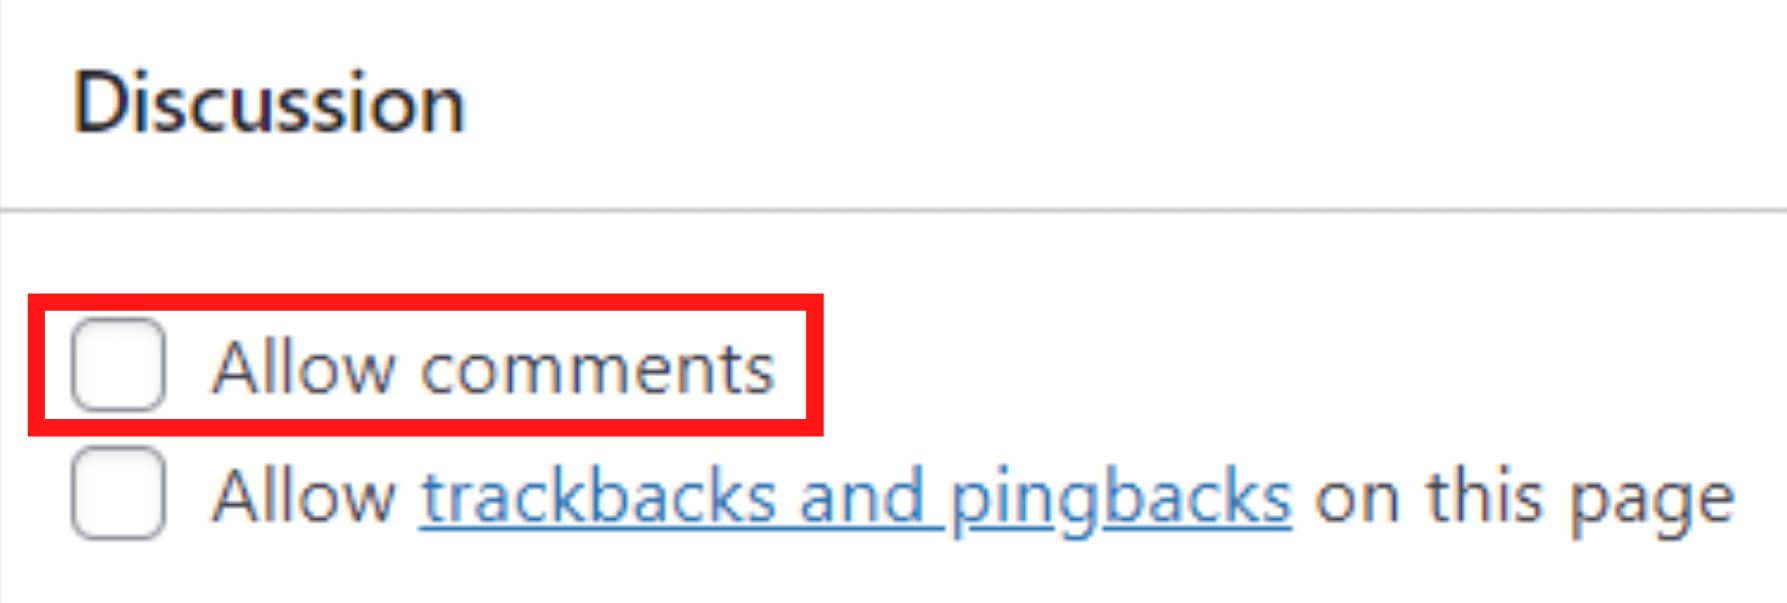
To close comments on a specific page or post:
- In the admin left-hand menu, head to Posts/Pages → All Posts/All Pages.
- Choose the Edit option under your post or page.

3. Click Screen Options on the top right of the screen.
4. Enable the Discussion option.
5. Scroll to the bottom of the page, in the Discussion section, deselect the checkbox Allow comments.
#9 Remove Writing Distraction
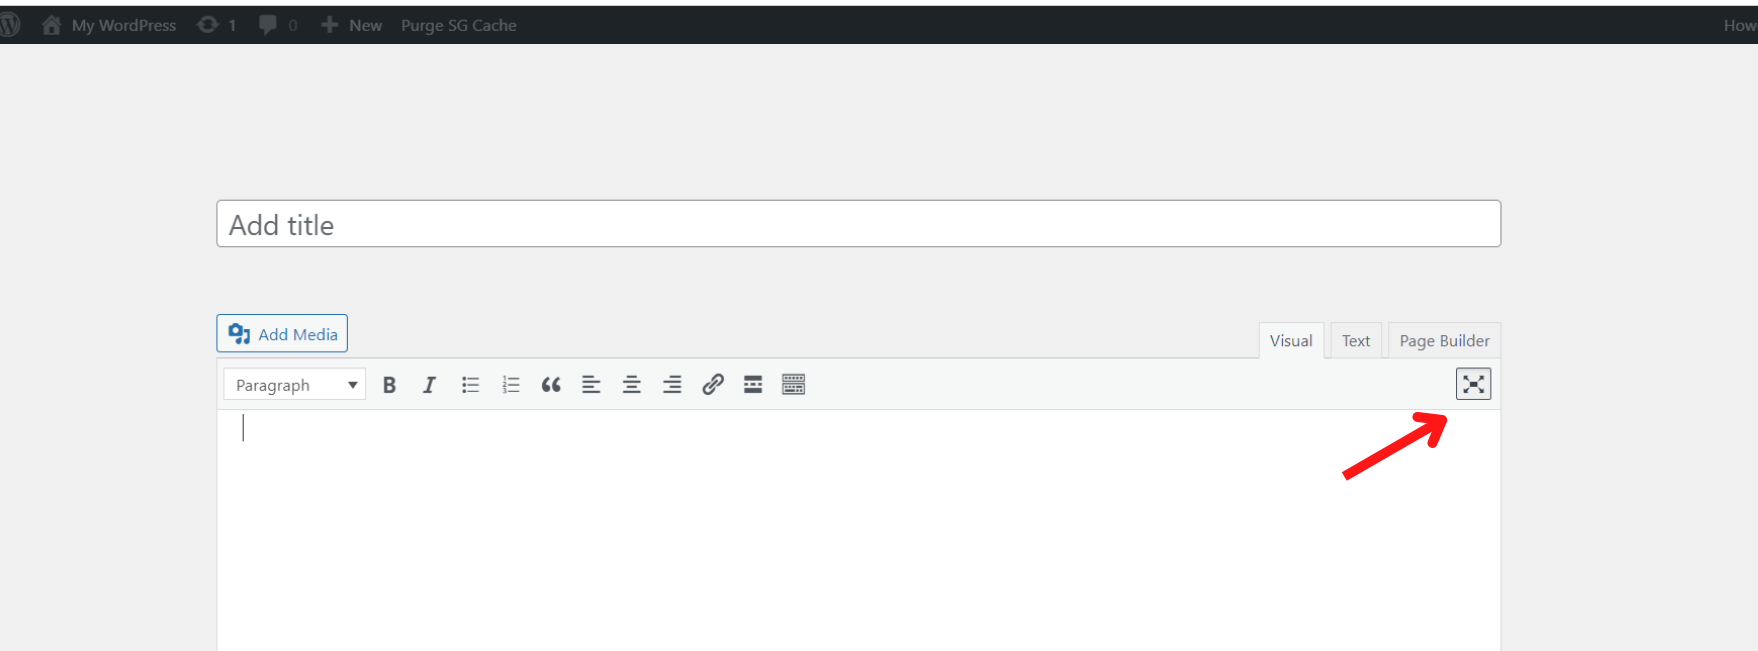
While writing blogs, items in the sidebars or menus may distract and annoy you. To help you concentrate on your writing, WordPress has a handy distraction-free writing mode built right into its native editor.
You can simply click the icon on the top right corner of your blog to disable the distraction-free writing mode. Once clicked, all that visual noise will be instantly gone from your screen.
#10 Upgrade Site from HTTP to HTTPS
Google announced that they would block all HTTP content because it’s considered unsafe. That’s why you need to upgrade your site from an insecure HTTP to a more secure HTTPS connection.
Thankfully, WordPress now allows you to switch a site from HTTP to HTTPS with only one click without having to touch a piece of code. Here’s how to use that great WordPress feature:
- Navigate to your admin dashboard, and go to Tools → Site Health.
- If WordPress detects that your site’s URL is not using HTTPS, click the Update your site to use HTTPS button.
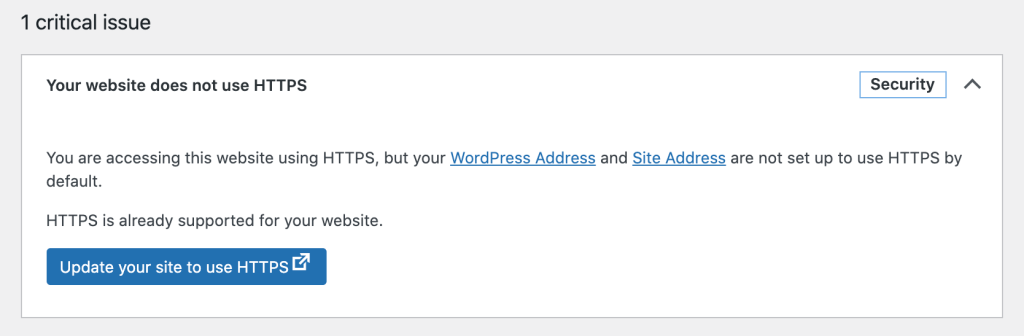
This will change all your site URLs to an HTTPS connection. Additionally, the site content will be migrated to the new HTTPS.
Be careful when migrating your website as it can cause mixed content errors.
Get the Most of WordPress Features to Level up Your Site!
This article has shown 10 excellent WordPress features that people often overlook. We hope that it helped you discover some new functions that you probably didn’t know about. We assure you that after applying these features, you will take your WordPress website to a new height.
So don’t hesitate any longer. Let’s get this show on the road!