
If you’re looking for ways to quickly sign documents without the need to download digital signature apps, you’re in the right place!
In this article, we’re going to show you how to sign documents on Ipad by making use of the Markup tool.
This way is helpful whenever you’re out and about with your iPad and iPhone and then your employees email you important documents to sign and send back in a short time.
Without further ado, let’s get the ball rolling!
- How to Sign Documents on iPad using Markup
- How to Directly Add Signatures to Email Attachment and Send Back
How to Sign Documents on iPad using Markup
While you can easily create electronic signatures on Mac using the Preview app, Apple offers a built-in Markup feature allowing you to sign documents on iPad, iPhone, or iPod touch with ease.
Brought to life with iOS10 in 2016, since then, Markup has constantly evolved years by years. You can digitally sign or add signatures to your documents pretty easily anywhere the tool is available, including other Apple apps, such as:
- Photo: choose a photo, tap “edit” > “…” > Markup from the popup
- Mail: Open a mail message, hit an attachment, and tap Markup
- Files: Open a file you’d like to sign and tap Markup
- Messages: attach the photo/PDF you want to sign in the message box, tap it, choose Edit > Markup
- Safari: Open a webpage that contains the document you plan to sign, hit the Share menu then choose Create PDF > Markup
- Notes: select a document in your note, then choose the Share menu > Markup
- iBooks: Open a PDF and tap Markup at the top
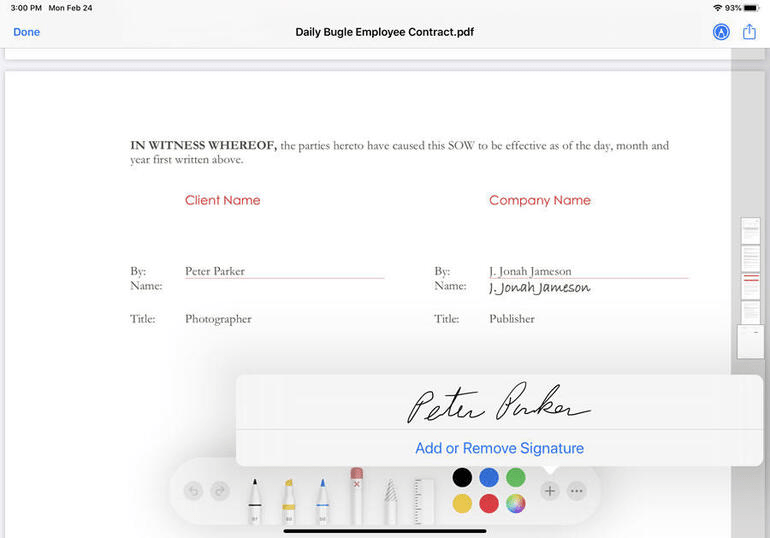
To sign documents on iPad, follow our step-by-step guide below:
- Open the document you need to sign in a Markup-supported app
- Tap the “+” icon at the bottom of the Markup interface.
- Choose the Signature option from a popup.
- Sign your name using Apple Pencil or choose an already saved one from the menu.
- Insert your signature in the document. Tap on it to drag it around, adjust its size and position.
- Hit Done to save your changes
Note: To change the color of your signature, tap on it and select any of the provided color circles at the bottom of the Markup screen.
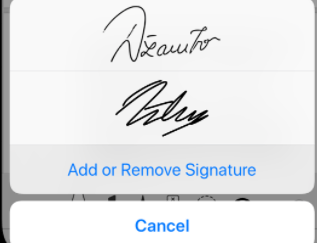
Add or Remove Signatures
With Markup, you can create and save as many signatures as you would love to.
- In the Files app on your iPad, open a document then hit the Markup icon at the top
- Tap the “+” icon place at the bottom of your iPad screen, which opens a popup menu. Choose Add or Remove Signature.
- Add a signature: Tap “+” and sign your name. If you don’t satisfy with the end result, choose Clear to start over. To save your signatures, hit Done.
- Remove a signature: Tap “-” next to an already saved signature > choose Delete.
How to Directly Add Signatures to Email Attachment and Send Back
In case your document is in urgent need of getting signed and sent back, you can use Markup to directly sign documents on an email attachment.
The whole process takes you less than 2 minutes. Here is how:
- Open your attached PDF or image and locate your signature position
- Tap the Markup icon, which looks like a pen tip in the upper right corner
- In the Markup toolbar, hit the “+” button and select Signature. Your signature will show up on the spot if you already created it using Markup
- Tap your signature, drag, and change its size accordingly. Once ok, choose Done.
- Hit New Message or Reply All then send the signed document back to the sender
Conclusion
We have walked you through the step-by-step guide on how to sign documents on iPad using the Markup tool.
This built-in feature allows you to create a new digital signature or add an existing one to PDF right off the bat. You don’t have to waste your storage to download any digital signature apps to get the job done.
Plus, we have also shown you how to directly sign documents on an email attachment and send them back. This comes in handy as you can enhance your workflow even when you’re away and in an urgent moment.
If you have any questions on how to sign documents on iPads, post them in the comment section below and we’ll reach back to you as soon as possible.