Want to sign an Excel document but don’t know how? This article will show you the guide.
Microsoft allows you to not only digitally sign in Word but also add digital signatures to Excel. As long as you have a Microsoft account, you can freely choose to insert visible or invisible digital signatures into your worksheet without any hassle.
This article will provide you with 2 ways to add digital signatures to Excel, both visible and invisible ones. Plus, how to remove signatures is also brought forward. The bonus of adding signatures to Excel on Mac will wrap up this article.
Let’s dive in!
- How to Add Digital Signatures to Excel
- Can We Insert Invisible Digital Signatures into Excel?
- Bonus: How to Add Signatures to Excel on Mac
How to Add Digital Signatures to Excel
Placing a digital signature on Excel is just a piece of cake. The whole process involves 5 steps:
- Open the sheet you want to insert a digital signature. Select a cell then click Insert > Text > Signature Line > Microsoft Office Signature Line

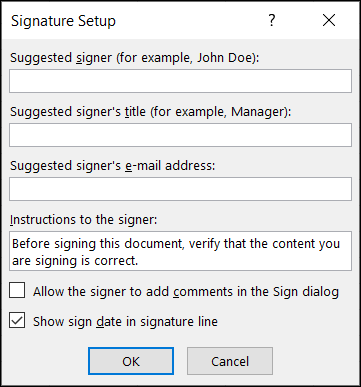
- Fill in all essential details in the Signature Setup popup
– Suggested Signer: input the name of the person who will sign the document.
– Suggested Signer’s Title: fill in the title or position of the signer.
– Suggested Signer’s Email Address: input the email address of the signer.
– Instructions to the Signer: fill in special instructions or details for information verification (optional)
– Allow the Signer to Add Comments in the Sign Dialog Box: click on this option if you want to comment, note, and leave messages on the document.
– Show Sign Date in Signature Line: check this option in case you plan to include the date on which you sign a document.
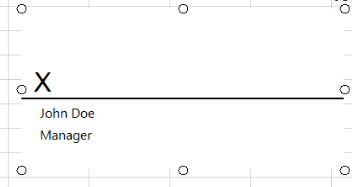
- Once done, click OK and a signature line will show up on your Excel sheet.
- Right-click on the signature line and click Sign. Type your name on the signature line or upload an image as your signature.
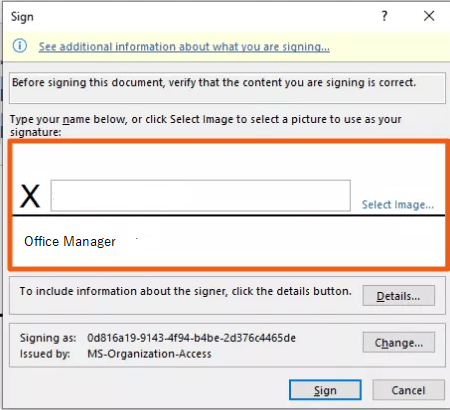
- Click on Sign and you’re done
Remove Your Signatures in Excel
All you need to do is:
- Head to the document or worksheet that you intend to remove the digital signature
- Right-click the signature line, then select Remove Signature.
- Click Yes and you’re done.
Alternatively, you can delete a signature by hitting the arrow next to the signature in the Signature Pane. Click on the Remove Signature option and that’s it.
Can We Insert Invisible Digital Signatures into Excel?
Yes, you definitely can! Microsoft Excel gives the green light to invisible digital signatures to protect the authenticity of your workbook content.
Creating an invisible digital signature in Excel is easy as the visible one. The following guide will show you how:
- Open the Excel document that you’d like to add an invisible digital signature.
- Under the File tab, click Info > Protect Workbook > Add a Digital Signature.

- Read the Excel notification and click OK.
- In the Sign dialog box, type the signing purpose in the Purpose for signing this document box.
- Hit the Sign button and your Excel file is invisibly signed.
- Remove the invisible signature by choosing File > Information > View Signatures.
- Click the arrow next to the signature name and hit Remove.
Note: As soon as you digitally sign the document, a Signatures button appears at the bottom of your screen. In addition, your file turns into “read-only” to prevent modifications.
Bonus: How to Add Signatures to Excel on Mac
As a matter of fact, you can’t insert signatures in Excel Mac using the platform itself due to a different document format between iOS and Microsoft.
To add signatures to Excel on Mac, you might need the help of a third-party digital signature app. Among thousands of apps out there, we recommend the free and easy-to-use PDFelement. It supports MacOs10.14, 10.15, and 11.
Since the tool works on PDFs only and not on Excel directly, you’re required to convert your Excel worksheet to PDF.
After downloading the PDFelement to your Mac, what you need to do next include:
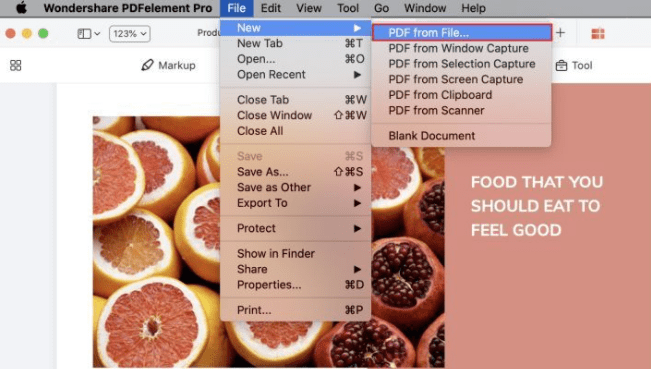
- Open PDFelement, hit Create to convert your Excel document to a PDF file
- Go to File > New > PDF from File and choose the file you have just converted
- Navigate to the “Markup” menu, click on Signature > Create Signature to add a signature to Excel
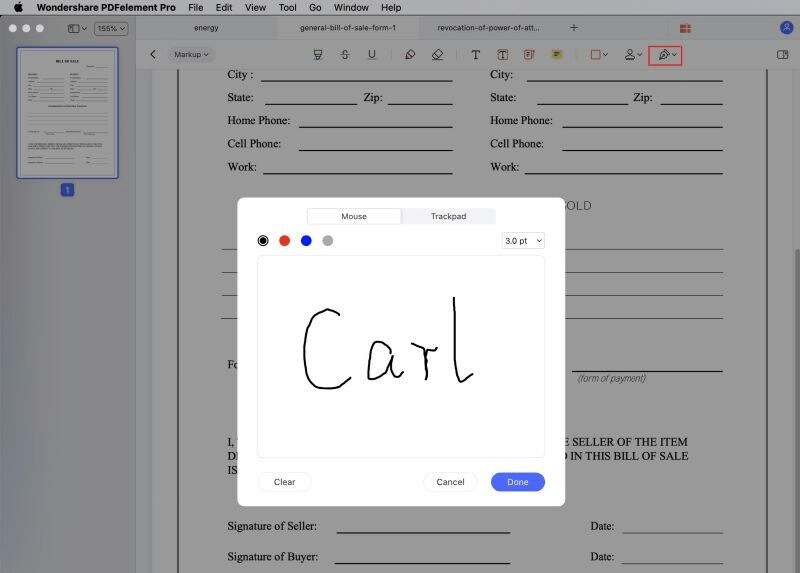
- Once you’re satisfied with your signature, hit Done
Conclusion
This article has walked you through 2 simple ways to add digital signatures to Excel.
Microsoft Excel provides a built-in option allowing you to digitally sign your document without any fuss. You can insert visible or invisible ones depending on your purposes. You even don’t need a third-party app like AdobeSign or Hellosign.
On the other hand, when it comes to signing an Excel document on Mac, you have to seek help from an external tool like PDFelement.
Having any queries or get stuck on any step? Let us know by leaving a comment below and we’ll reach out to you as soon as possible.