WooCommerce provides you with a default product search function enabling customers to find products in your store quickly. In fact, this feature is quite basic with a simple search bar on your online store.
This requires you to improve the findability function of your store to deliver the best experience for users. You need to create a fast, accurate, and flexible search experience for customers.
In this article, we’ll walk you through a step-by-step guide on how to add a smart WooCommerce product search to your store. We’ll use the Smart WooCommerce Search plugin in our tutorial.
Let’s jump in!
Why Using Smart WooCommerce Search Plugin
Smart WooCommerce Search is built on top of the WordPress Custom post type search functionality to make it easier for customers to find relevant products on your store. By improving search results accuracy and speed, customers are more likely to complete an order.

The plugin is simple to install and configure. You can also view stats and make changes to the search results, such as displaying products on top of the results.
Let’s take a look at how you can get started with the Smart WooCommerce Search Plugin.
How to Add WooCommerce Product Search to Your Store
Step 1: Install Smart WooCommerce Search Plugin
To have the plugin ready on your site, simply:
- Go to Plugins > ‘Add New’ in your WordPress admin dashboard
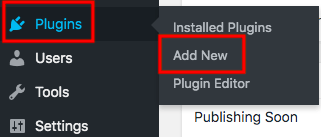
- Type ‘smart woocommerce search’ in the keyword box
- Install and activate the plugin
Upon activation, go to WooCommerce > ‘Smart Search’. The page will display some statistics about your current search feature. Underneath it, you will see the Plugin Activation section where you will need to enter your license key and activate it.
After that, click on the Save Changes button at the bottom of the page.
Step 2: Enable Smart WooCommerce Product Search
The smart search feature can be enabled for the product search widget by following the steps below:
- Go to WooCommerce > ‘Smart Search’ > ‘Default’
- Enable smart search
- Click on the ‘WooCommerce Product search’ option
- From the ‘WooCommerce Product Search’ settings, find the ‘General’ tab and tick the checkbox/activate the slider with the ‘Enable Smart Search in Product Search Widget’ option.
Step 3: Create Content Types for Smart Search
The next thing is to create the content types for Smart Search. We need to tell Smart Search what information to look for and where to find it in our database. This part of the process is surprisingly simple and takes just a few minutes.
First, go to Components → ‘Smart Search’ → ‘Indexes’ and click ‘New’. Add a Title, such as ‘WooCommerce Products.’
- Configure the new index
Next, we’ll add Content Types that Smart Search will use when searching your site. In this example, we’ll add two — one for Product Categories and one for Products. Click Content Types under the ‘Configuration’ tab, then click ‘New.’
- Add content types for WooCommerce products
For the first type, choose “Smart Search – WooCommerce” from the Type dropdown menu, then select “Products” from the Parameters dropdown menu. Click ‘Save & Close.’
- Create a content type for WooCommerce products
Repeat these steps for Product Categories using “Categories” in the Parameters dropdown menu instead of “Products.”
Step 4: Create Taxonomy for Smart Search
The taxonomy provides a way to organize and describe content by placing items into hierarchical categories. The categories and their relationships are established by the rules that you create. So items in the same category share similar properties. For example, if you have items with similar descriptions, you can create a rule that places those items into one category.
Your taxonomy affects how items appear in Smart Search. Once you click in the Smart Search box, a list of categories appears based on your taxonomy rules. If a category has subcategories, they also appear on this list as submenu options under their parent categories.
You can edit your existing taxonomy rules or add new ones to control how items are categorized and displayed in Smart Search.
Step 5: Add Products to Smart Search
To add products to Smart Search:
- Select ‘Catalogs’ > ‘Smart Search’. The Smart Search page displays.
- Choose ‘Add New Record.’ The Select Product page displays.
- If necessary, click the ‘Product Name’ field and then pick the product you want to add to Smart Search. The product name appears in the field after selection.
- Select ‘Save’ to save the record and return to the Smart Search page.
Step 6: Display the Smart WooCommerce Search Bar in WordPress
If you run an online shop, a good search function is essential to give your customers the best experience possible. Give them a better experience by placing the WooCommerce Search Bar on your site.
To show up the custom search bar in WordPress, you need to visit ‘Smart Search’ > ‘Custom Widgets’. From there, copy the shortcode for the new product search.
Troubleshooting: If you want to remove or change the options within the search box, you need to visit ‘Smart WooCommerce Search Options’ » ‘Edit Shortcode’. From here, you can edit the shortcode to change the options.
Let Customers Find Your Products Easily
Adding a smart search function to your WooCommerce store lets customers look for their items with ease. They’re able to get relevant results without having to spend a lot of time going through individual product categories.
The process of adding a smart WooCommerce product search to your online store with the tutorial above. You can use the Smart WooCommerce Search plugin to not only enable product search but also create content types and taxonomies for searches.
What’s your experience with the Smart WooCommerce Search plugin? Share with us in the comment section below.
You can also check out our resource for more useful reviews and tutorials about WordPress and WooCommerce.