Checkout page no secret plays the most crucial role in your eCommerce store. It’s the final gate deciding the revenue in your pocket.
According to recent research by Baymard, “$260 billion are recoverable through checkout optimizations.”
That’s why in this article, we’ll show you how to optimize your normal checkout page into a one-page checkout to drive more sales for your store.
The article will begin with tips to an effective WooCommerce one-page checkout, then dig deep into 2 steps to create a WooCommerce one-page checkout using a plugin.
How and When to Use WooCommerce One-page Checkout
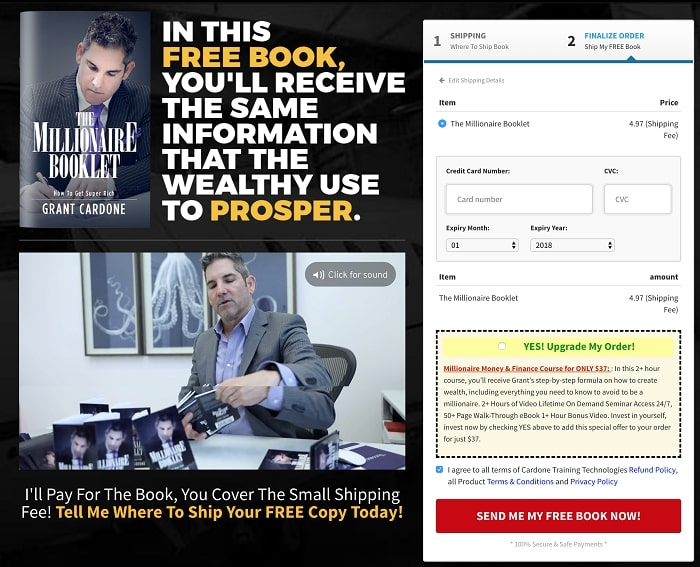
One-page checkout, aka single-page checkout, displays different elements of the checkout process, including cart items, billing, shipping, payment details, etc. on one single page.
This type of checkout proves helpful in reducing cart abandonment by eliminating all the distraction elements in the checkout process. Plus, there is no back and forth involved. Users don’t have to switch a tab or reload the page to complete their payments.
Below are several tips you should know for an effective one-page checkout:
- The ultimate goal of one-page checkout is no other than notching up sales and collecting revenues for your stores. This means your one-page checkout must encourage customers to place their orders as many as possible. As such, you must ensure no flurry content that takes user attention away.
- All the necessary information that users need to review before hitting the “Purchase” button, i.e product, billing, shipping details,… should be shown up on the same page.
- Avoiding any additional links that disrupt user flow and takes them to a different URL.
- A long checkout page might cause users to run out of steam. Remember to keep things simple, neat, and professional. Plus, it’s highly recommended to give options or extra custom fields allowing buyers to personalize their products.
- Optimize your WooCommerce one-page checkout on the mobile version, since it’s as important, if not more, as the desktop version.
There are various ways to create a WooCommerce one-page checkout for your stores. You can either pin your faith on plugins, page builders, or codes if you’re a tech keener.
In this tutorial, we’ll stick to the popular method, which is using a WooCommerce one-page checkout plugin.
How to Create WooCommerce One-page Checkout Using a Plugin
Aimed to reduce cart abandonment, WooCommerce One Page Checkout guarantees to simplify the checkout process yet ensure the shopping experience.
What makes it apart from its competitors is the ability to turn any page into a checkout page. More than that, you can choose to include both product selection and checkout forms on a single page. This comes in handy as customers can add/remove any products and complete their payments without leaving or reloading a checkout page.
WooCommerce One Page Checkout enables you to create unique custom landing pages for specific products, customers, or sale events. Checkout fields can be added to any landing page. Plus, it lets you choose certain products to display on each checkout page or build a page for a featured product.
Since you’ve known its amazing features, the following guide will show you how to create a WooCommerce one-page checkout with this plugin.
The process of setting up one-page checkout goes through 2 steps:
- Step 1: Create One-page Checkout Shortcode
- Step 2: Add One-page Checkout Shortcode to Your Checkout Page
Let’s get started!
Step 1: Insert the One-page Checkout Shortcode Using the Graphic Interface
Currently, the graphic interface is only available with the Classic Editor plugin. Make sure the editor is in visual mode.
After having this premium plugin installed and activated, what you need to do are:
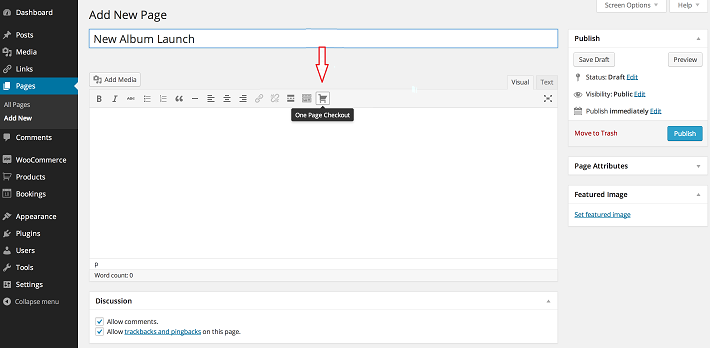
- In your WordPress dashboard, open the page or post you want to add the checkout to. (Pages > Add New or Posts > Add New).
- Click on the One Page Checkout icon displayed on your editor
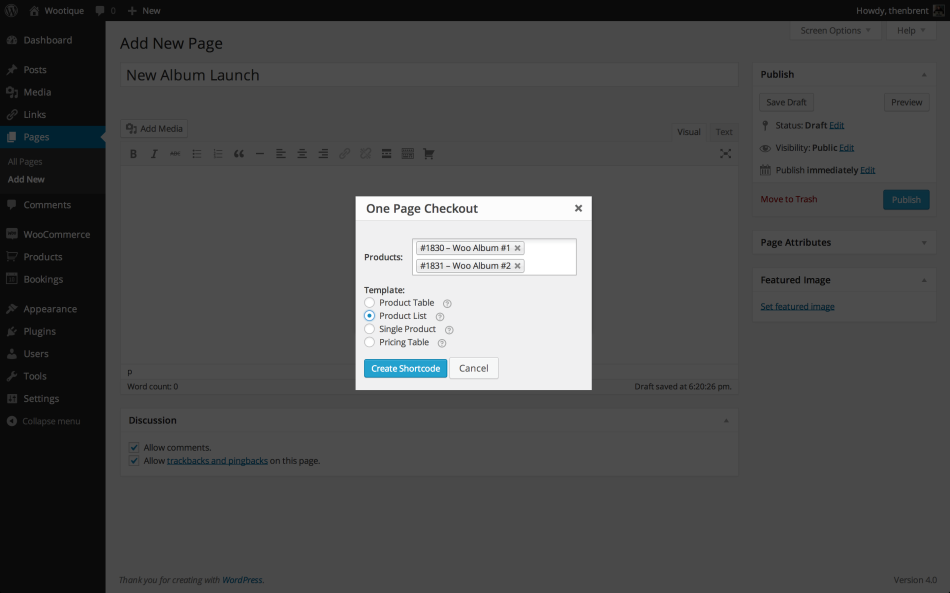
 3. Click inside the Products field and type the product name/s to display
4. Select the products to display
5. Select the template to use for product selection fields
6. Click Create Shortcode and you’ll get the [woocommerce_one_page-checkout] shortcode.
Step 2: Add One-page Checkout Shortcode to Your Checkout Page
Use the shortcode you’ve already created in step 1 and embed it to your desired page or post. In particular:
- Add [woocommerce_one_page-checkout] in the content of a specific page or post
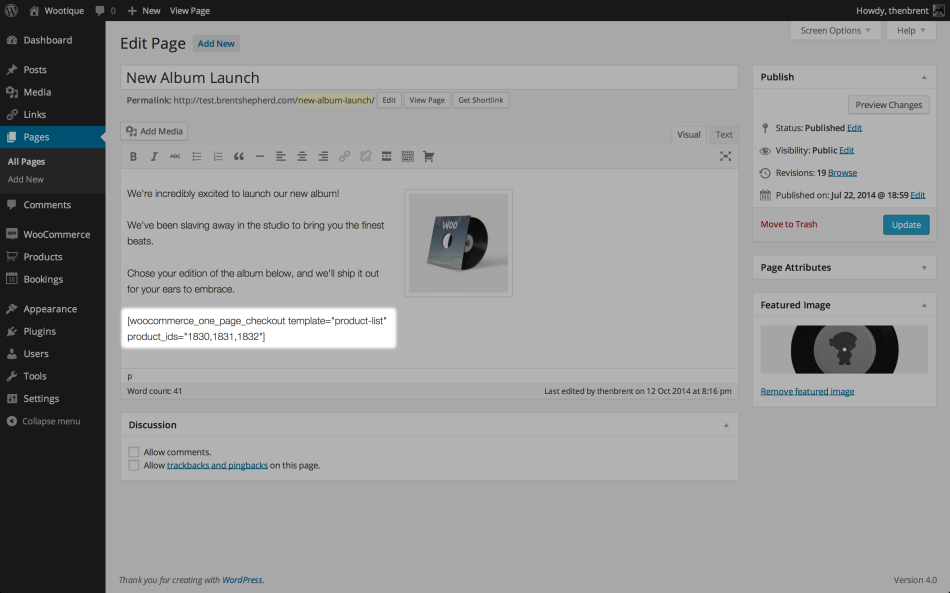
- Insert the product_ids=“ ” attribute, including the list of product IDs that you want to display at the top of the checkout page. For example:
[woocommerce_one_page_checkout product_ids=”32,43,13″]
3. Decide which product selections are displayed by using the built-in templates.
Insert the template=“ “ attribute along with the slug of a specific template to be displayed. The standard templates and their slugs are as follows:
- Product List: product-list
- Product Table: product-table
- Single Product: product-single
- Pricing Table: pricing-table
For instance:
[woocommerce_one_page_checkout template=”pricing-table”]
For more information, check out this official documentation about WooCommerce One Page Checkout.
4. Update or publish the page or post that you are working on
5. Sit back and enjoy earning more revenue!
Conclusion
One-page checkout strategy proves useful in capturing abandoned carts and driving up sales. To deliver a seamless one-page checkout process, you must ensure a quick, clear, and distraction-free for shoppers.
Having said that, it doesn’t mean a one-page checkout offers a one-size-fits-all solution. What works on this site may not work for the others. In some cases, multi-page checkouts can be more effective. Taking your business scales into consideration, then choosing the most suitable checkout style.
This article has given you a glimpse into WooCommerce one-page checkout tips and tutorials on how to create a one-page checkout with WooCommerce One Page Checkout plugin.
If you have any questions regarding this topic, feel free to drop us a line in the comment box below!