Every year, e-commerce brands lose $18 billion in sales revenue due to cart abandonment. One of the root causes lies in the complicated checkout process.
The checkout page serves as a final gate to turn browsers into customers. An ideal checkout page must ensure a smooth transaction for users from start to finish. If you’re looking to drive more conversions and improve the bottom line for your stores, optimizing your WooCommerce checkout page is a must!
In this article, we’ll spell out why you should customize WooCommerce checkout pages. Plus, 2 effective ways to style and leverage your checkout page are also brought forward.
Let’s get started!
- Get to Know WooCommerce Checkout Pages
- Why You Should Customize WooCommerce Checkout Pages
- How to Manually Customize WooCommerce Checkout Pages with Code
- Edit WooCommerce Checkout Pages Using Plugins
Get to Know WooCommerce Checkout Pages
By default, the WooCommerce checkout page looks rather dull and simple. Its duty is no other than requiring shoppers to input some basic information, including first and last name, address, phone numbers, email address, order notes, and billing details, etc.
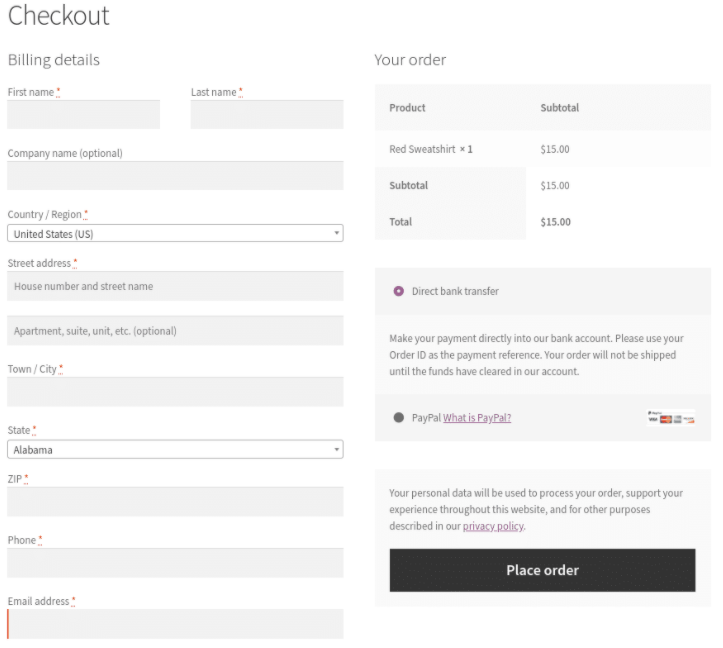
Though these details are essential for websites to process the payment data and for clients to complete the purchase, they don’t lend a helping hand in boosting conversion or reducing shopping cart abandonment.
On top of that, the default checkout page doesn’t target the key information as well as presenting no strategic order. That’s why you need to give your checkout page a few tweaks, in both design and content.
Before we dive into 2 effective ways to customize WooCommerce checkout pages, let’s discuss further the benefits of checkout page customization.
Why You Should Customize WooCommerce Checkout Pages
The first and foremost benefit is to provide quick and easy purchases, which deliver a seamless online shopping experience to customers.
By customizing the checkout page, you can sweep all the fluff away and focus on the essential details only. Asking customers to complete the checkout process with many field inputs on multiple pages can cause them to run out of steam. This will lead to a high chance of page drop-off.
Plus, trying to customize WooCommerce checkout pages gives your store a unique, professional look and feel. Remaining the default one makes your site sink like a stone among thousands of WooCommerce stores out there. Optimizing your checkout page, including the design will make your store stand out from the crowd and cause a stir on clients.
All in all, these ideas are working toward the same goal: killing cart abandonment.
While hardly do buyers in brick-and-mortar stores cast off their carts, abandonment in online shopping carts is quite frequent. In which, the average cart abandonment rates for checkout pages are as high as 87%.
And according to the Baymard institute research, among the reasons for abandonment during checkout, too long or complicated checkout process takes 27%.
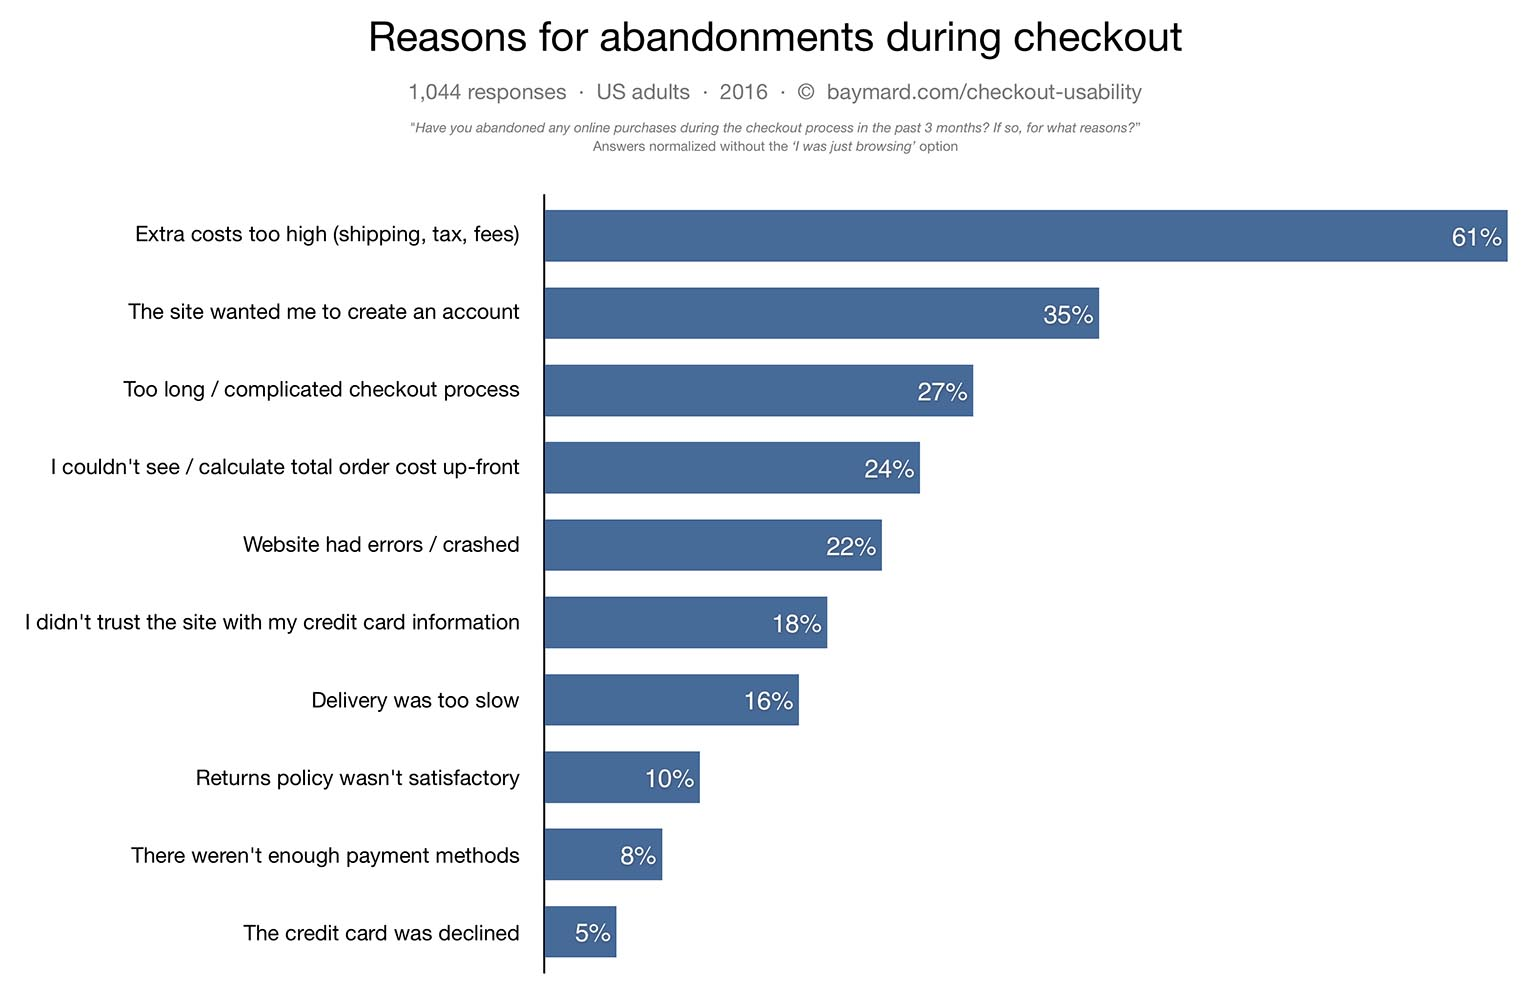
As a result, to decrease the shopping cart drop-off rate, you should pay attention to the user experience on the “before checkout” process.
There are various ways to provide a better user experience, such as by:
- Changing checkout templates and designs
- Adding, removing, and rearranging fields
- Making required fields optional
- Optimizing placeholder and labels
- Triggering free shipping costs
- Creating one-page checkout
In this tutorial, we’ll concentrate on optimizing checkout fields. Keep reading on the next sections to know how to customize WooCommerce checkout pages with and without codes.
How to Manually Customize WooCommerce Checkout Pages with Code
If you’re a WordPress tech-savvy and feel confident when touching PHP files and Javascript, you can freely edit your checkout page using custom codes.
We’ll provide you with some code snippets to edit the checkout fields, including change placeholder text, add and remove fields, as well as make a required field optional. Don’t worry, it won’t beat your brains out!
Edit the Checkout Fields
Making use of the functions.php file of your site and WooCommerce filters to edit your checkout fields. As you may not know, WooCommerce offers a list of actions and filters letting you customize checkout fields almost as your desire, namely:
- woocommerce_checkout_fields
- woocommerce_billing_fields
- Woocommerce_shipping_fields
- woocommerce_checkout_before_order_review
- woocommerce_checkout_before_customer_details
- woocommerce_after_checkout_form
Next, as using the woocommerce_checkout_fields filter will enable you to override any field, we’ll show you how to hook into it and change the displayed text, add and remove fields entirely.
Change Placeholder Text
Assuming that we’ll change the placeholder text on the order_comments fields. Here is what it looks like by default:
_x('Notes about your order, e.g. special notes for delivery.', 'placeholder', 'woocommerce')To change it, add this code snippet to your functions.php file:
// Hook in

add_filter( 'woocommerce_checkout_fields' , 'custom_override_checkout_fields' );

// Our hooked in function - $fields is passed via the filter!

function custom_override_checkout_fields( $fields ) {

$fields['order']['order_comments']['placeholder'] = 'My new placeholder';

return $fields;
Add fields to the WooCommerce Checkout Page
- Insert the following code to your function.php file to start editing your checkout page:
<?php
/**
* Add the field to the checkout page
*/
add_action('woocommerce_after_order_notes', 'customise_checkout_field');
function customise_checkout_field($checkout)
{
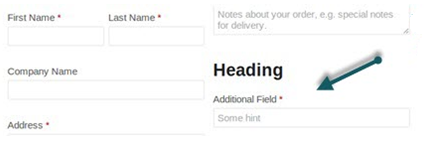
echo '<div id="customise_checkout_field"><h2>' . __('Heading') . '</h2>';
woocommerce_form_field('customised_field_name', array(
type' => 'text',
'class' => array(
'my-field-class form-row-wide'
),
'label' => __('Customise Additional Field') ,
'placeholder' => __('Guidence') ,
'required' => true,
) , $checkout->get_value('customised_field_name'));
echo '</div>';
}An additional field will show up on your checkout page after adding this code:
2. Add the code below for data validation.
<?php

/**

* Checkout Process

*/

add_action('woocommerce_checkout_process', 'customise_checkout_field_process');

function customise_checkout_field_process()

{

// if the field is set, if not then show an error message.

if (!$_POST['customised_field_name']) wc_add_notice(__('Please enter value.') , 'error');

}
3. We’ve done adding fields to the checkout page as well as the validation check. It’s time to make sure all the customer input will be saved properly.
This can be done by using the following code:
<?php

/**

* Update value of field

*/

add_action('woocommerce_checkout_update_order_meta', 'customise_checkout_field_update_order_meta');

function customise_checkout_field_update_order_meta($order_id)

{

if (!empty($_POST['customised_field_name'])) {

update_post_meta($order_id, 'Some Field', sanitize_text_field($_POST['customised_field_name']));

}

}
Remove Fields from the WooCommerce Checkout Page
Using the code given below:
// Hook in

add_filter( 'woocommerce_checkout_fields' , 'custom_override_checkout_fields' );


// Our hooked in function - $fields is passed via the filter!

function custom_override_checkout_fields( $fields ) {

unset($fields['order']['order_comments']);


return $fields;
Make a Required Field Optional
Let’s say you sell the virtual products and would like to make the “Address” field in the Billing section optional. Simply add the following code to the functions.php file of your child theme.
add_filter( 'woocommerce_billing_fields', 'wc_address_field_optional');

function wc_address_field_optional( $fields ) {

$fields['billing']['billing_address_1']['required'] = false;

return $fields;

}
Note: Considering any mistakes left in the function.php file can cause your site to be disabled, you must back up your site before making any changes. We recommend a risk-free way, which refers to using your child theme’s function.php file.
Edit the WooCommerce Checkout Page Using Plugins
In case you’re a non-techie, seeking the help of powerful plugins will always be a smart idea.
Among thousands of WooCommerce optimization plugins, WooCommerce Checkout Manager happens to be a hotshot to customize WooCommerce checkout pages.
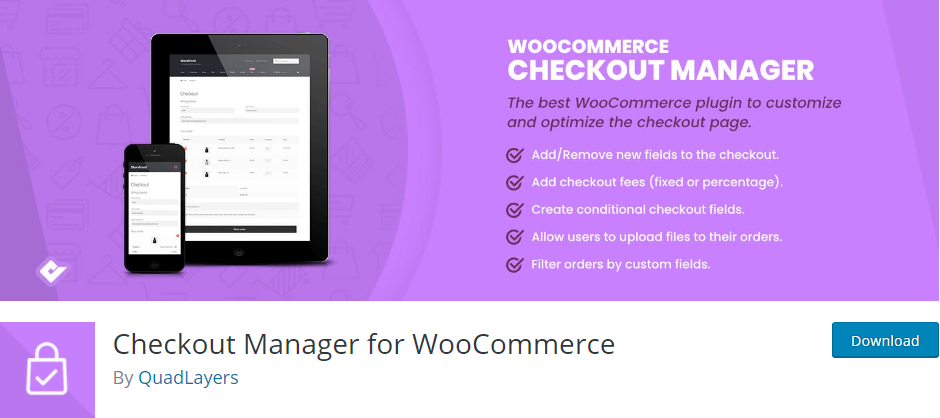
Developed by Quadlayers, this free yet powerful plugin is definitely the one you don’t want to leave on the table.
The plugin enables you to freely customize WooCommerce checkout pages by including/excluding fields, making fields required/optional, and extending the billing data with ease. You can improve the user experience and boost sales by creating conditional fields. Other than that, it doesn’t limit you to the number of file upload types. You can let customers upload any file from various types effortlessly/with no effort.
On top of that, its user interface also deserves a thumb up as all modifications are done by simply enabling options from the menu.
So how to optimize your WooCommerce checkout page with WooCommerce Checkout Manager?
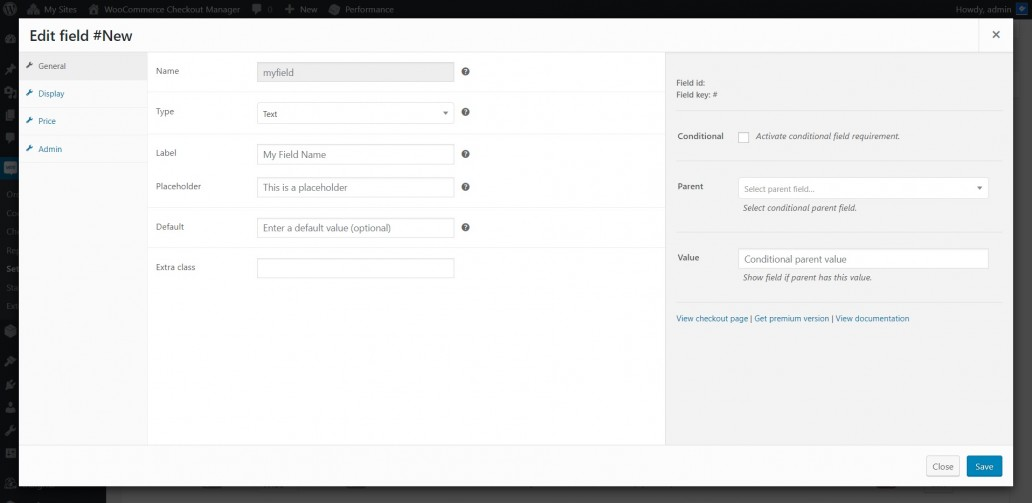
#1 Add New Fields to the Checkout Page
WooCommerce Checkout Manager permits you to create custom fields to the checkout page in the Billing, Shipping, and Additional fields sections.
After having the plugin installed and activated, in your admin dashboard, go to WooCommerce > Checkout > Billing.
- Select “Add New Field.”
- Fill in the field name, label, and placeholder.
- Choose field types.
- Hit “Save” to update all changes.
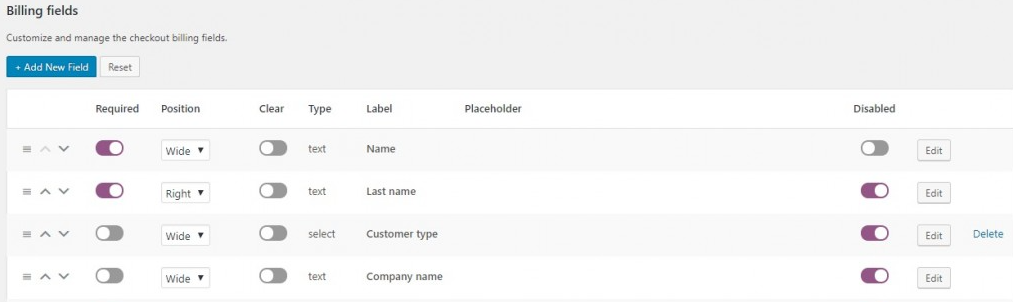
#2 Delete Fields from Checkout Pages
You can freely remove fields by toggling the “Disable” button.
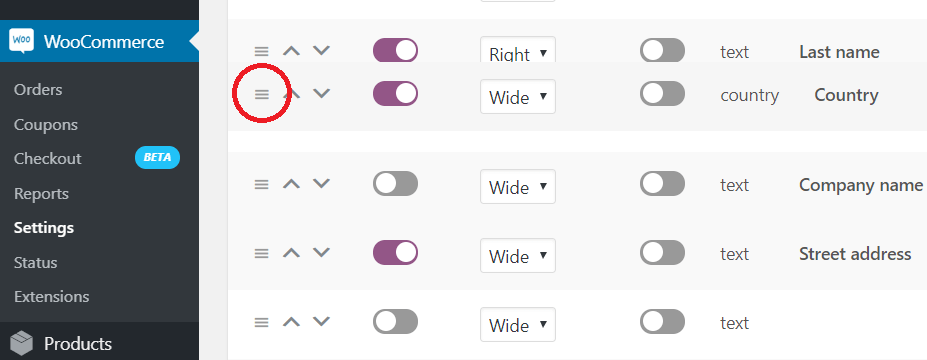
#3 Rearrange Checkout Field Position
Changing the default order of the checkout fields by:
- On the field you want to move, clicking on the 3-vertical-line button.
- Hold that button, drag, and drop the field to the desired position.
- Hit “Save Changes” on the bottom of the page.
Optimize Your WooCommerce Checkout Page Now!
Modifying the WooCommerce checkout page can make a huge difference to your stores and take your checkout process to the next level. Even the slightest customization also paves the way for speeding up the checkout process, enhancing the shopping experience, and notch up sales.
In this post, we’ve shown you 2 ways to customize WooCommerce checkout pages. You can either choose a plugin solution or directly insert code snippets into the function.php file.
In case you want to add further optimization to your store, check out this guide on how to add custom fields to WooCommerce product pages for more information.
If you have any questions on WooCommerce checkout page optimization, do drop a comment and we’ll get back to you as soon as possible.