
Offering free shipping comes as an easy but effective way to incentivize customers to shop more.
Not only does it help eliminate the traumatic cart abandonment problem, but it also increases average order value, notches up sales, and retains more loyal customers.
Transportation Insights has pointed out that free shipping is twice as effective as percent-off offers in boosting sales.
While setting up free shipping based on location is just a piece of cake, most site owners find it tricky to assign free shipping for specific products in WooCommerce.
To ease your concern, we’ve worked on this topic to give you a comprehensive guide on how to add free shipping on certain WooCommerce products.
Spoiler alert! You have 3 methods to choose from.
- #1. Using WooCommerce Shipping Classes
- #2. Setting Up Free Shipping on Certain Products Manually
- #3. Using WooCommerce Advanced Free Shipping Plugins
Enable Free Shipping for Specific Products in WooCommerce
Basically, you can enable free shipping for specific products in WooCommerce
- Using WooCommerce shipping classes
- Manually. Yes, when we say “manually,” it means touching “code.”
- With the help of relevant plugins.
Though it sounds technical, the whole process doesn’t require you any steep learning curves. We’ll try to make it as easy to catch up as possible.
#1. Using WooCommerce Shipping Classes
As a matter of fact, WooCommerce doesn’t come with any available features letting you directly apply free shipping on certain products.
To achieve this, you need to go through WooCommerce shipping classes and the default Flat Rate shipping method.
Keep in mind that WooCommerce shipping classes function to create WooCommerce grouped products.
So, they can’t be used directly to offer shipping rates to customers. In other words, it needs to be teamed with a shipping method, i.e. Flat Rate to configure the shipping rate.
The whole process consists of 4 steps:
- Step 1: Add shipping classes
- Step 2: Set up shipping zone
- Step 3: Apply shipping cost for the shipping class
- Step 4: Assign shipping classes to certain products
Our step-by-step guide comes as below:
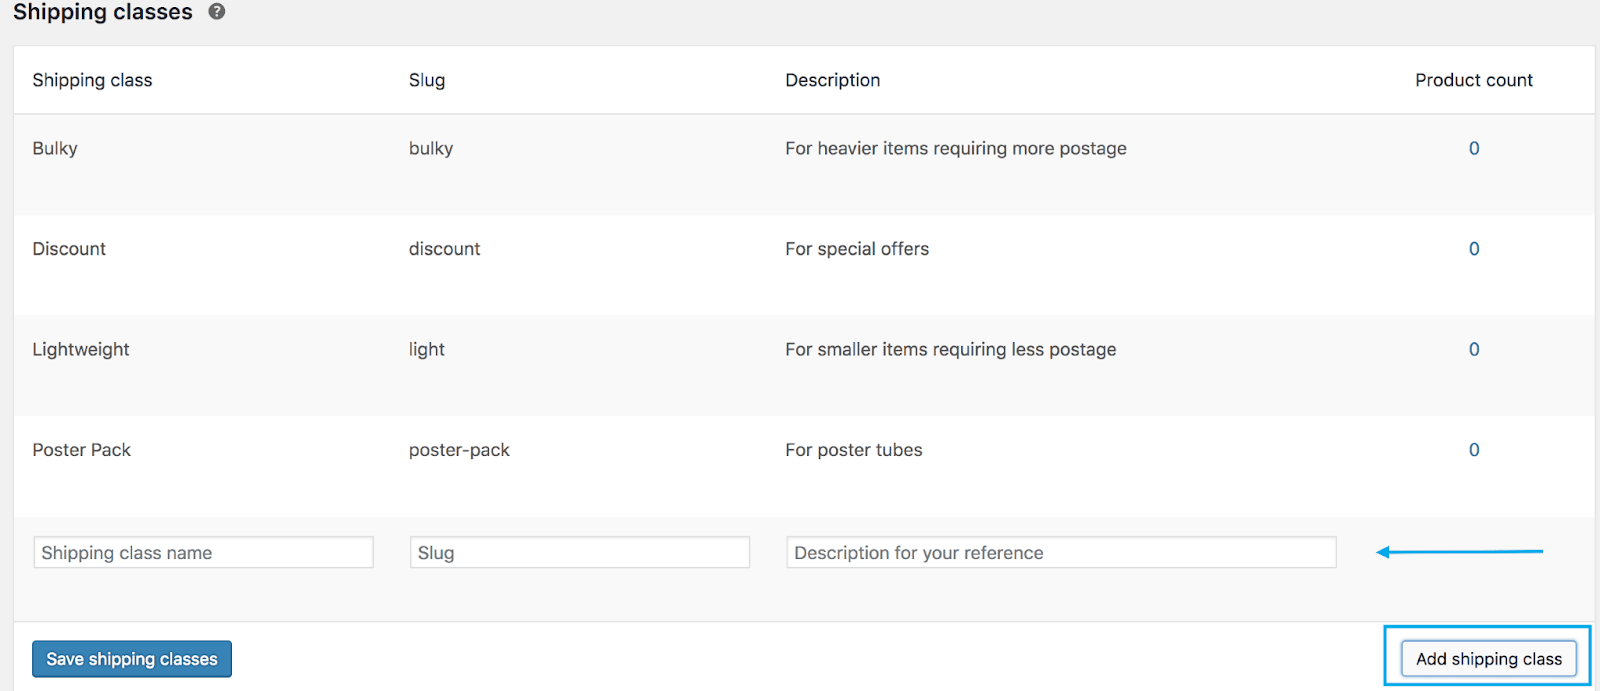
Add Shipping Classes
- In your WordPress admin dashboard, go to WooCommerce > Settings > Shipping > Shipping Classes. Click on the Add shipping classes button, which opens a new row.
- Fill in the Shipping class name and Description for your reference. You can leave the Slug field blank as it’s auto-generated. Alternatively, you can enter a custom one.
- Hit Save shipping classes.
Set up Shipping Rates
In this step, you need to set up the shipping rates in the shipping zone to offer free shipping for specific products in WooCommerce.
- Head to WooCommerce > Settings > Shipping.
- Select your preferred Shipping Zone. Hit Edit.
- Click Add Shipping Method and choose Flat Rate from the dropdown menu.
- Hit Edit under Flat Rate. A pop-up window appears where you can configure the Flat Rate settings.
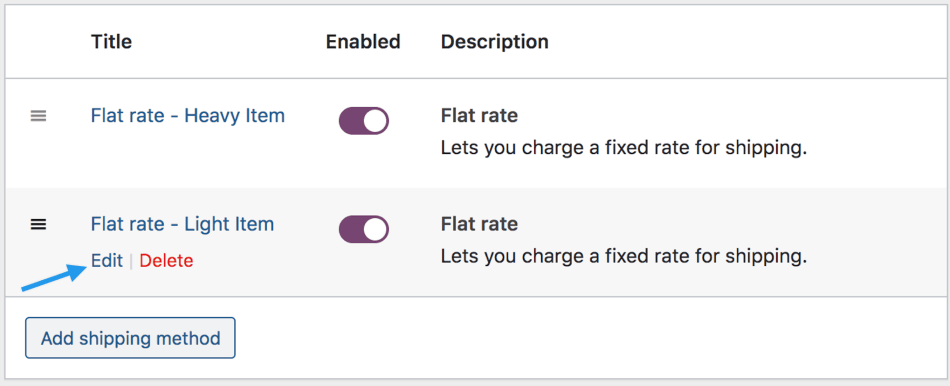
- In Method title, enter a title that displays to customers in the cart and checkout.
- Leave Tax status and Cost as default.
Apply Shipping Cost for the Shipping Class
Let’s say you add 2 shipping classes as “free-product-classes” and “Hoodie-class” as regular shipping classes.
In the Shipping Class Costs section, you set the “free-product-classes” shipping class costs to 0. By doing so, no matter how many products from that class are added to the cart, the shipping cost will not increase.
On the other hand, the “Hoodie-class” shipping class costs can be assigned a bigger number, for instance, 10. This means it takes $10 per product in this class to ship.
Note: To make sure things work as planned, you must set the Calculation Type to “Per Class: Charge shipping for each shipping class individually” and that the Cost field is left blank.
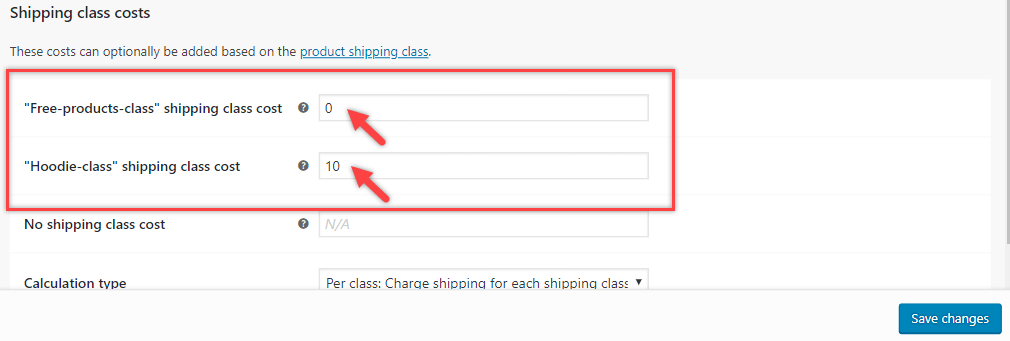
Don’t forget to save your changes.
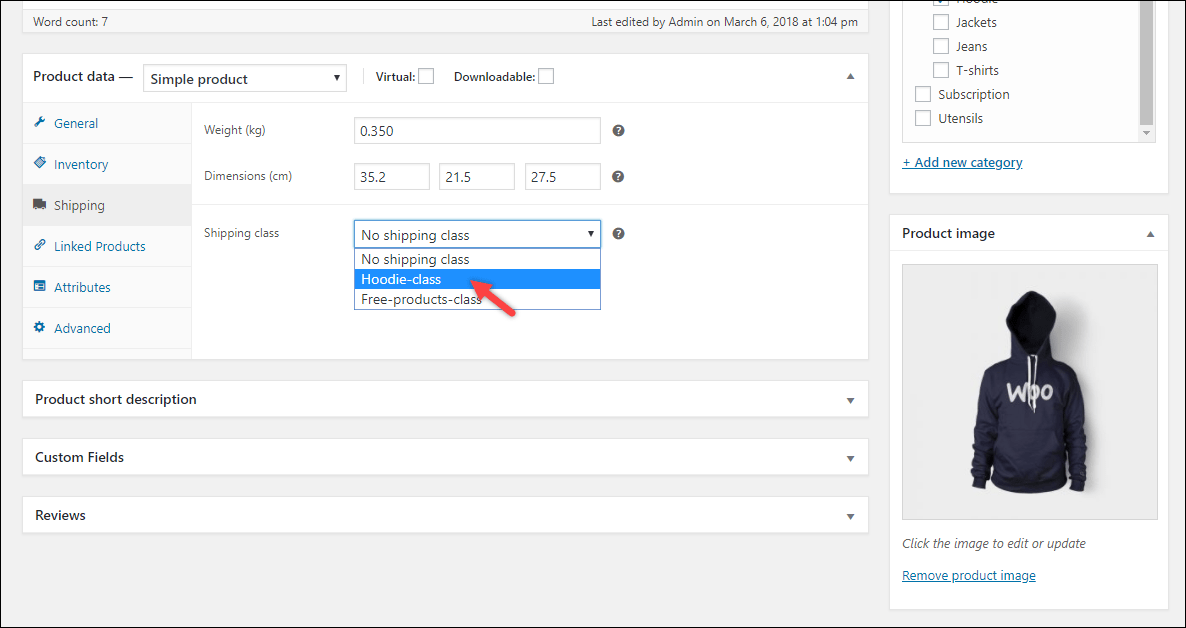
Assign Shipping Classes to Certain Products
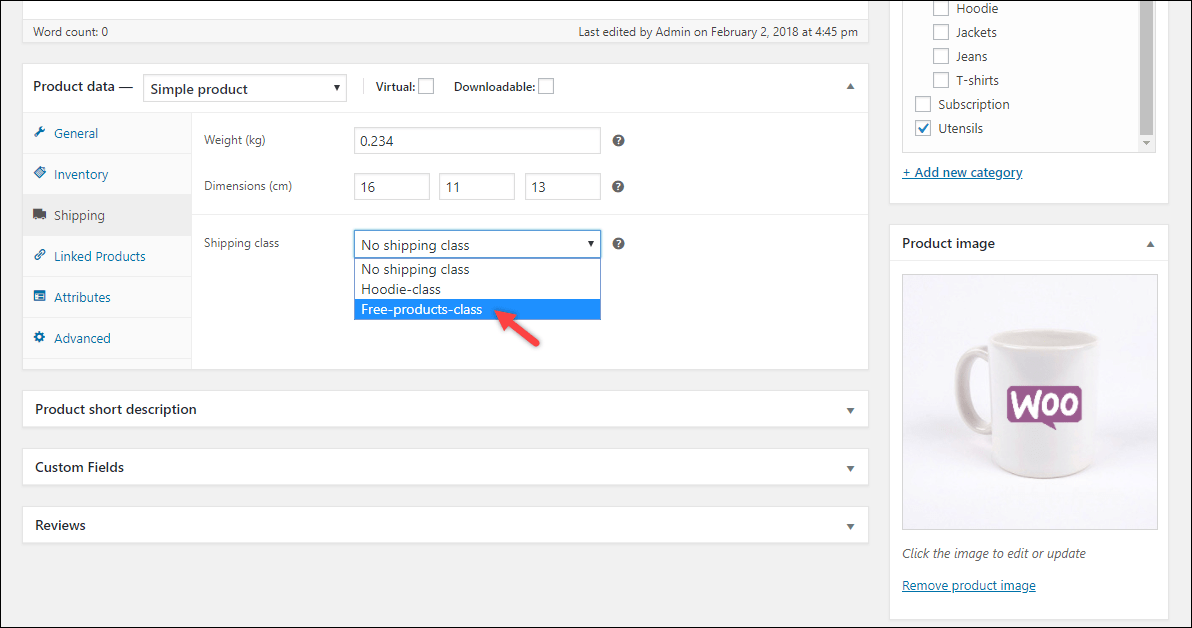
Now, it’s time to assign shipping classes to relevant products. You can select the class type for each product.
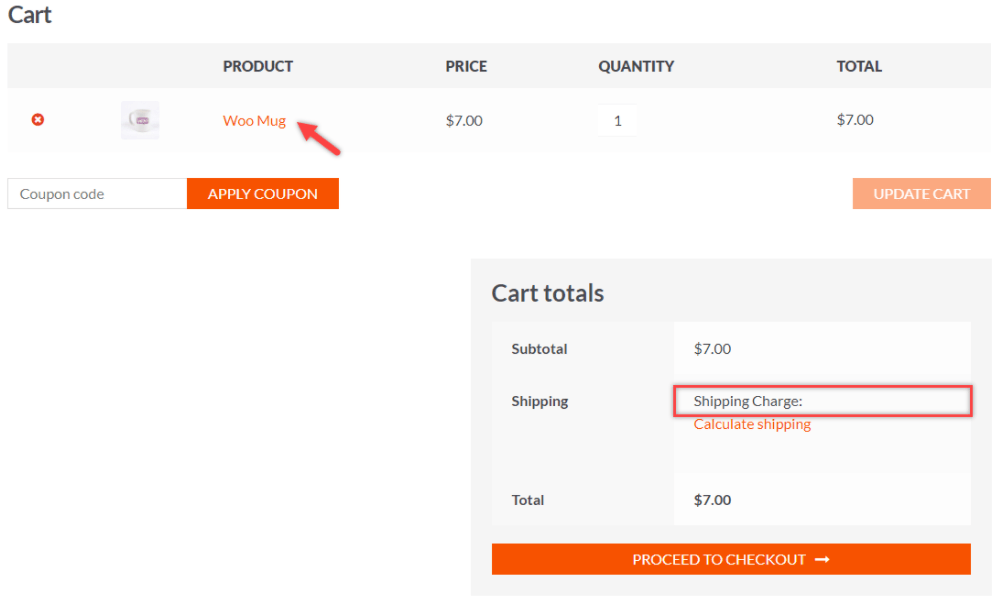
For example, the “Woo Hoodies” is assigned the “Hoodie-class” shipping class (image 1), while the “Woo Mug” product refers to the “Free-products-class.” (image 2)
Now, you should visit the cart page and see how the shipping rates are applied on your WooCommerce cart page. The flat rate should remain empty in the cart when the free product is added to the cart.
#2. Set Up Free Shipping on Certain Products Manually
In case you’re a code maven, you can directly set up free shipping for specific products in WooCommerce using codes. Copy and paste the following code snippet to your functions.php file.
<?php

function wcs_my_free_shipping( $is_available ) {

global $woocommerce;


// set the product ids that are eligible

$eligible = array( '360' );


// get cart contents

$cart_items = $woocommerce->cart->get_cart();


// loop through the items looking for one in the eligible array

foreach ( $cart_items as $key => $item ) {

if( in_array( $item['product_id'], $eligible ) ) {

return true;

}

}


// nothing found return the default value

return $is_available;

}

add_filter( 'woocommerce_shipping_free_shipping_is_available', 'wcs_my_free_shipping', 20 );(Source)
Remember to replace the product_id with the actual product ID that you plan to assign free shipping.
#3. Using WooCommerce Advanced Free Shipping Plugin
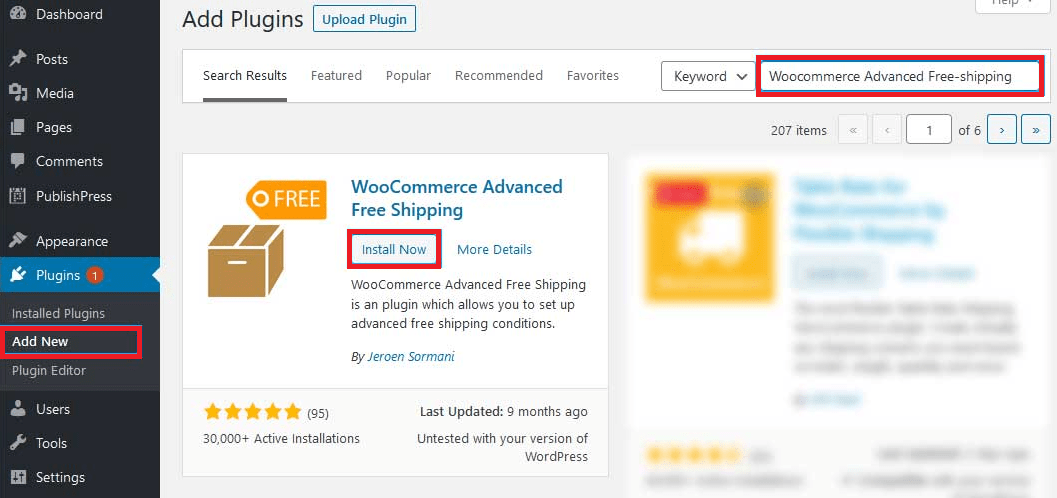
In this tutorial, we’ll be using the WooCommerce Advanced Free Shipping plugin. It’s one of the most widely-used WooCommerce shipping plugins in the market, with over 50,000+ active installations.
WooCommerce Advanced Free Shipping gives you the power and flexibility to play with the free WooCommerce shipping rates.
Each shipping rate lets you create numerous “OR” condition groups, and at the same time, add various “AND” conditions within each of these groups.
This means it’s possible for you to set up free shipping for specific products in WooCommerce, for multiple user roles at just one shipping rate.
The plugin has won our praise thanks to its easy setup and straightforward UI and features. Upon installation, you can configure the shipping settings right off the bat.
First, you need to get the plugin installed and activated. In your WordPress dashboard, look for “WooCommerce Advanced Free Shipping” on the plugin search bar. When the plugin shows up, hit “Install Now” then “Activate.”
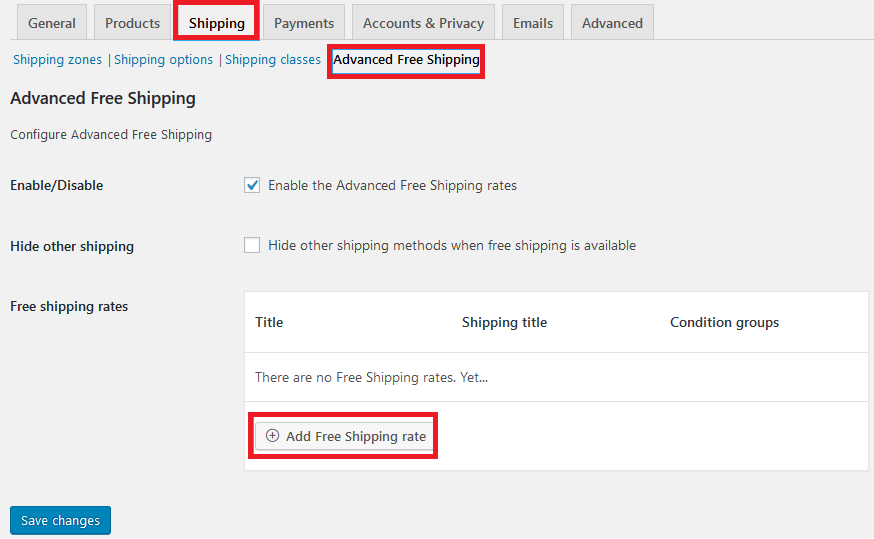
Next, navigate to the settings page and start setting up your free shipping rates and conditions.
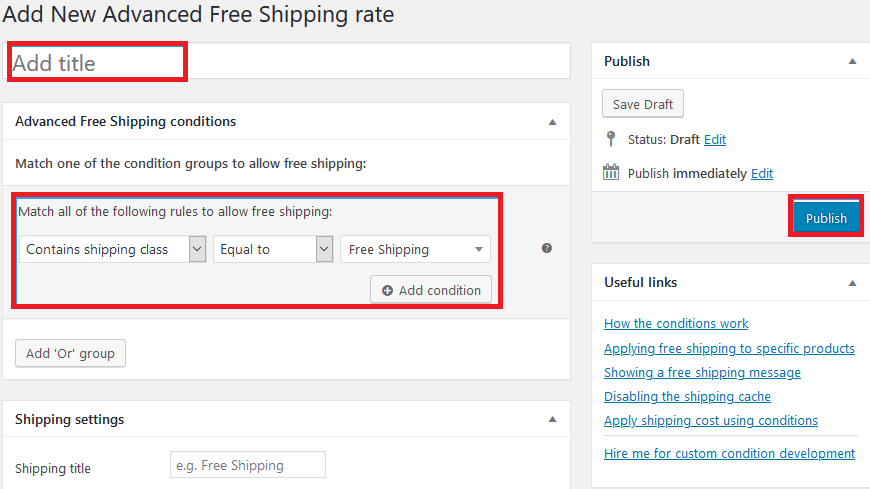
- Go to WooCommerce > Settings > Shipping > Advanced Free Shipping.
- Check the “Enable Advanced Free Shipping rates” option. Next, click Add Free Shipping rate, which opens another screen.
- Add the title of the new advance shipping rate.
- Set up rules for your shipping class. If you want to add free shipping to a single product, you need to include the free shipping class in its rules.
– Choose your “Contains shipping class” in the dropdown
– Select “Equal to” and “Free Shipping” for the other 2 boxes. - Hit Publish.
Ready to Apply Free Shipping to Your Products?
Free shipping comes as a great incentive to encourage customers to spend more, which drives more sales to your store.
Our article has walked you through 3 ways to set up free shipping for specific products in WooCommerce. You can make use of WooCommerce shipping classes along with the Flat Rate shipping method.
Another straightforward way to apply free shipping on certain products goes to adding a custom code snippet to your functions.php file. Make sure to back up your site properly before making any changes.
Besides, you can seek help from the WooCommerce Advanced Free Shipping plugin to assign free shipping to single WooCommerce products.
Apart from these above methods, do have any cool ideas in mind to recommend? How can you define free shipping for specific products in WooCommerce? Let us know in the comment section below!