Social media advertising, especially Facebook, brings every business owner a host of benefits to enhance visitors’ shopping behavior. It enables you to test and set your ad target in a short period of time. More than that, with the birth of Facebook Pixel, you can measure conversions from form submissions or checkout on your website with ease.
Reality points out that tracking form submission with Facebook Pixel proves a magnificent way to optimize your advertising campaigns on this platform. It helps you not only access a large amount of relevant data but also increase sales.
In this post, we will spell out Facebook Pixel, how it works, and a step-by-step guide to add this tool to your WordPress site. We will walk you through how to track form submission with Facebook Pixel as well.
- What Facebook Pixel is and How It Works?
- How to Set up Facebook Pixel
- How to Track Form Submission with Facebook Pixel
What Facebook Pixel is and How It Works?
Facebook Pixel is just a bit of code you place on your website. To be more clear, it’s similar to Google Analytics since it tracks traffic and conversions from Facebook and Instagram advertisements. The data drawn from analytics will help build target audiences and retarget those who have previously interacted with your web pages.
![]()
For instance, users visit your website to make a purchase, read your content or click on an ad. Facebook Pixel will track all of the user activities by dropping cookies and tying them to your Facebook ads. It helps you keep in touch with your previous customers, which is known as retargeting.
Facebook Pixel Events
Not only does Facebook pixel track user actions but it’s also important for analytics and overall advertisement optimization. It tracks multiple activities of users which are called events. These are the most common standard events you should notice:
- Purchase – When a user actually makes an order and pays for your product.
- Pre-purchase: Users are considering other things and haven’t decided to take money out of their pocket yet. These events often happen on the checkout page, including ‘Add payment info,’ ‘Add to cart,’ ‘Add to wishlist,’ and ‘Initiate checkout.’
- Lead: Users are interested in your products, services, or content and want to learn more about them. These events consist of ‘Subscribe,’ ‘Submit application,’ ‘Start trial,’ and ‘Schedule.’
- Awareness: Search (function or content), View content, Find location, Contac
That’s all basic information about Facebook Pixel. Let’s dive into the following process to install Facebook Pixel on your site.
How to Set up Facebook Pixel on Your Site
The process of installing Facebook Pixel basically goes through 4 steps:
Step 1: Create a Facebook Pixel
Go to your Facebook Events Manager by clicking the icon with 9 dots on the left sidebar.
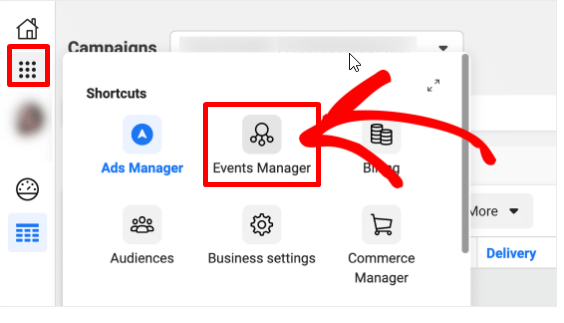
Continue clicking Collect to Data Sources.
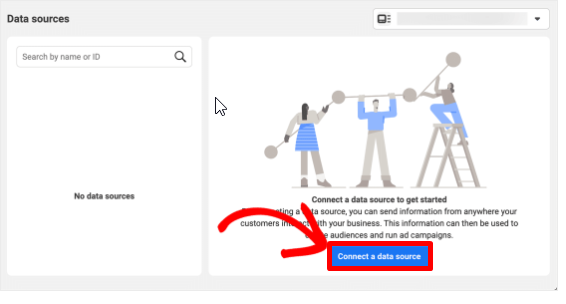
Then, choose Web and continue with Get Started.
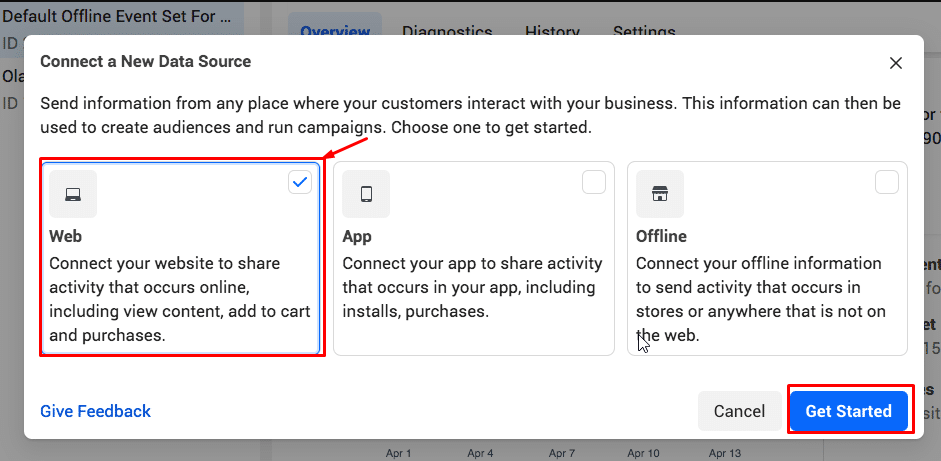
Move onto setting up Web Events, you need to select Facebook Pixel and click Connect.
![]()
When connecting website activity using Facebook Pixel, you need to add details about web events and parameters used to interact with your pages. Your pixel name and your website URL are also required before clicking Continue.
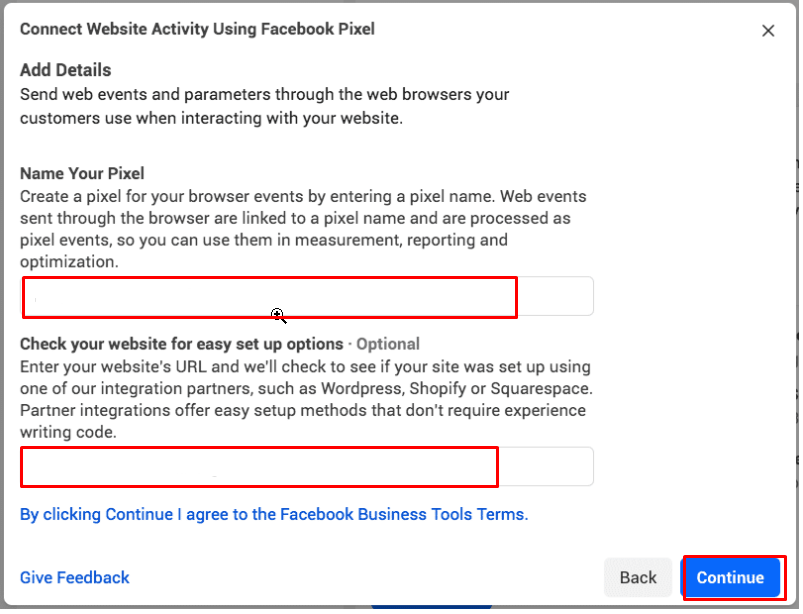
Remember that with each ad account, you can create one pixel code only. Your pixel name should symbolize your business, not your current campaign.
Step 2: Install Facebook Pixel Code on Your Site
It’s time to add the Facebook Pixel code to your website, this pixel will collect data from your web pages.
There are 2 options to install pixel code upon what website platforms you’re using.
- For those who use one of Facebook’s Partner Integrations such as WordPress, Shopify, SquareSpace, click on Use a partner.
- If you outsource a developer team, click Email Instruction to send them what they need to install pixel code. Or you have to Install code manually.
All options include detailed steps to connect your Facebook Pixel with ease.
![]()
Step 3: Establish Facebook Pixel Events
Firstly, go to the Open Event Setup Tool.
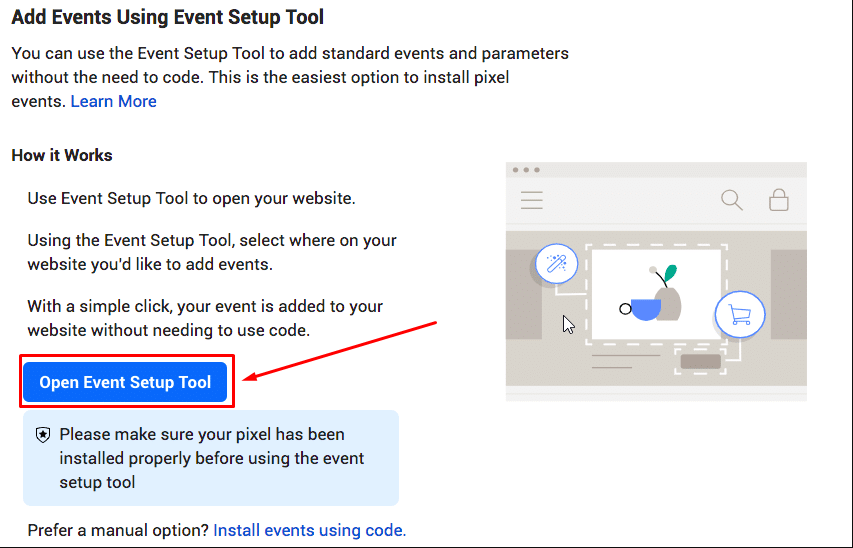
After selecting your Facebook Pixel ID, click on the Open Event Setup Tool in the Settings section.
![]()
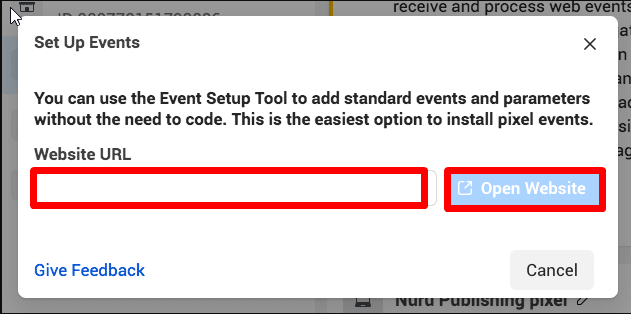
Then, drop your website URL in the blank and hit Open Website.
Now, you will receive a list of suggested events from Facebook. In each event, you can select Dismiss or Confirm depending on your demands.
Step 4: Make Sure Your Pixel Can Work with the “Facebook Pixel Helper” Properly
To confirm whether your Facebook Pixel operates properly or not, you need to have the Facebook Pixel Helper extension installed on your website. Keep in mind this extension plugin is only available for Chrome.
![]()
Then, head to the page where you intend to add the Facebook Pixel. There is a popup demonstrating how many pixels are found on the site. Otherwise, you will get an error notice and you have to fix this trouble.
How to Track Form Submission with Facebook Pixel
In this process, your Facebook account must be on a business level and you have to deactivate your ad blocker.
After having Facebook Pixel installed, follow the instruction below to track form submission with Facebook Pixel.
Step 1: Download WPForms Plugin
First off, make a purchase of the WPForms plugin. It is the most powerful WordPress form builder and allows you to make any form with no coding knowledge needed.
Once you finish installing this plugin, you need to add a contact form to WordPress.
Step 2: Make a Thank You Page for Form Submission
A Thank You page along with a short message will show up to users as long as they submit their forms. Based on this, Facebook Pixel will monitor your form performance more easily.
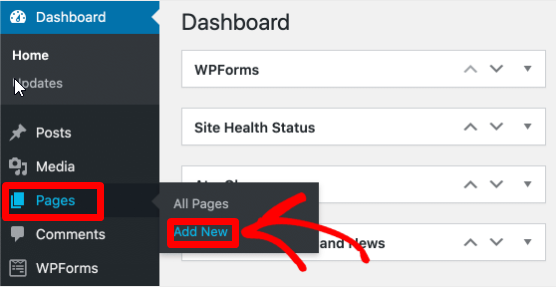
To create a new page, go to Pages and click Add New.
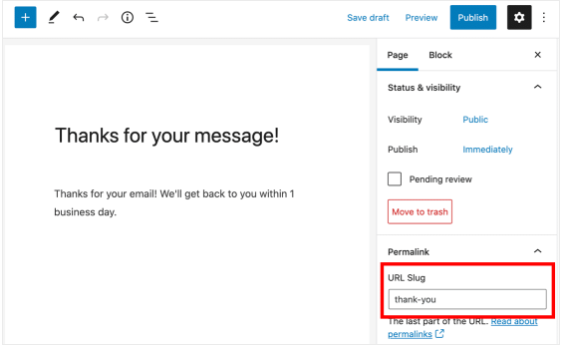
Next up, fill in your URL slug box with unique text, thank-you as an outstanding example. It must be done for Facebook Pixel to analyze this page later.
You should hide this page so that nobody can find it on search engines. This action will prevent your visitors from landing on this page without submitting your form.
Now, let’s adjust some index settings to make sure this page won’t be spotted by any search engine crawlers.
It’s so simple to hide your page inside Yoast SEO. Just click on Advanced in the Yoast SEO meta box, and switch two options to No.
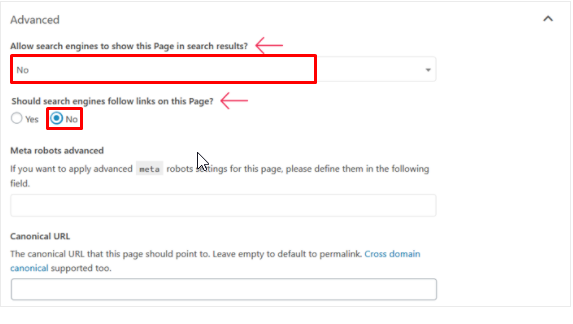
Save your settings and your Thank You page will no longer appear on any search engines. In the same vein, Facebook Pixel only monitors a visit on your site if it comes from a form submission.
Bear in mind that your new Thank You page mustn’t be covered on the navigation menus.
Now, move on to creating a form confirmation page.
Step 3: Create Your Form Confirmation Page
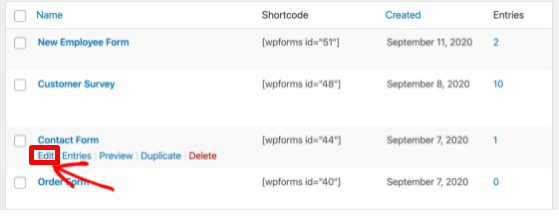
To make your Thank You page work well, scroll down to your Contact Form in the sidebar. Then, select Edit under the Contact Form you’ve already created.
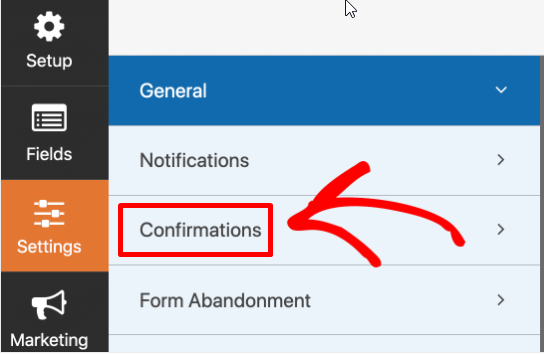
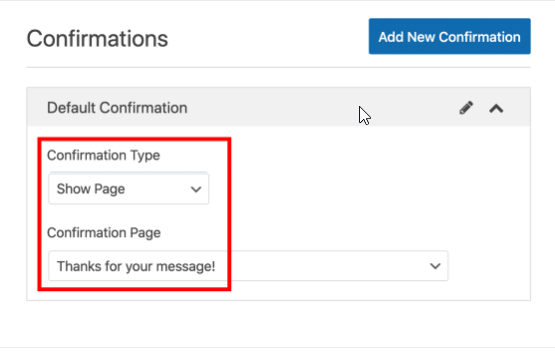
Next, go to Settings on the left side, choose Confirmations.
It’s time to switch your confirmation type to Message. This will show a box where you can type your note.
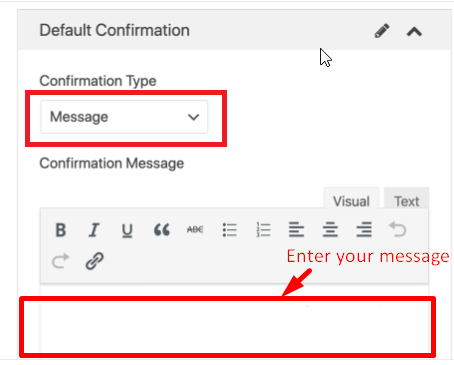
When the first dropdown pops up, choose Show Page for Confirmation Type. Select the name of the Confirmation Page and hit Save.
Step 4: Check Your Tracking Pixel
As soon as you activate Facebook Pixel on your site, your pixel will automatically begin capturing Facebook events. It will convey the data over to Facebook afterward.
To make Facebook Pixel function accurately, you need to test your tracking pixel. Besides Facebook Pixel Helper, we’ll show you an alternative for checking if the Pixel code is working.
In the Open Event Setup Tool section, select Test Events here to try out your tracking pixel.
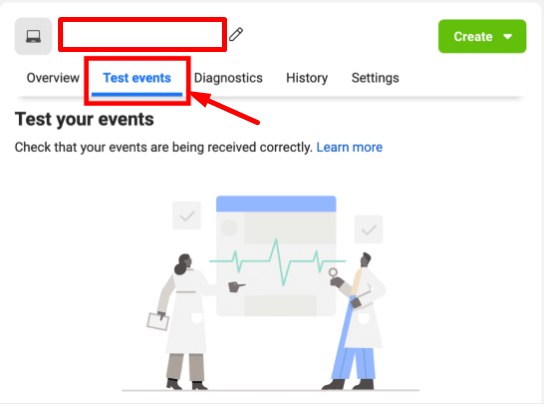
When you browse it on another tab, you’ll be able to examine each pageview to make sure that the code is still operating. Once that’s done, you have to add your custom conversion to track data from your Thank You page.
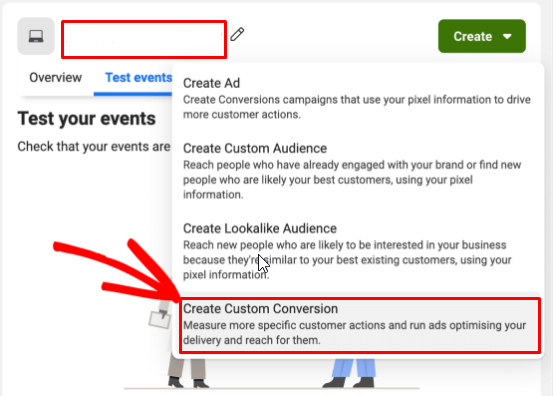
Step 5: Add New Custom Conversion
First off, hit Create on the top and select Create Custom Conversion in the dropdown window.
There is a few information you need to fill in to create a custom conversion:
- In terms of Name, you need to enter the unique one that you easily identify in data reports.
- Description is optional, but it’s necessary for efficiently tracking multiple form submissions.
- Select Pixel for Data Source.
- In the Conversion Event, let’s pick All URL Traffic.
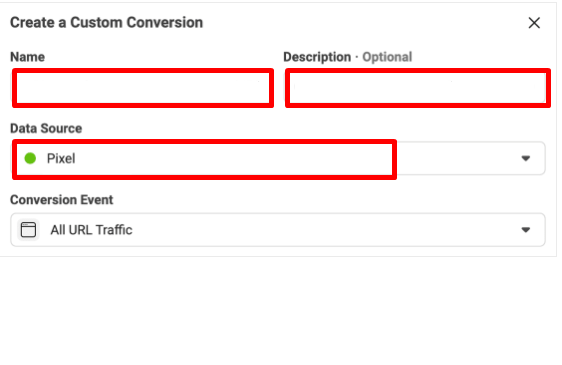
Keep in mind to change the rules to URL and contains to match your whole site. Referring to Enter a conversion value, it’s mostly used for e-commerce niches.
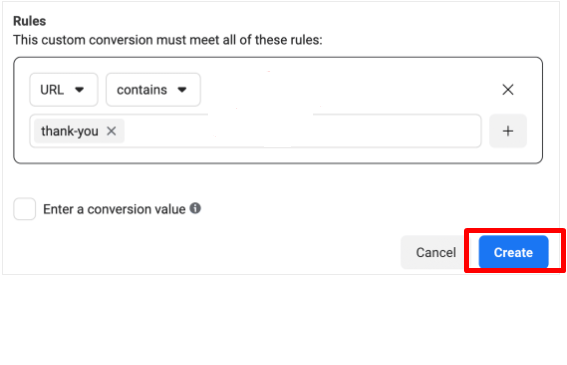
That’s done! Hit Create to track your form submissions with your new Facebook Pixel immediately!
Ready to Monitor Form Submission with Facebook Pixel?
All in all, the Facebook Pixel will make advertising on Facebook much more effective. Not only will you know exactly who you intend to advertise to, but you will also get a better understanding of your advertisement campaigns.
You now get the Facebook Pixel embedded into your website so you can start tracking form submissions as well as conversions. This can help to generate custom audiences for most of the standard events. Apart from that, Facebook Pixel can help you find more customers interested in your products.
Feel free to leave your comment if you need more help on how to track form submission with Facebook Pixel from us.
Check out our WordPress resources for more useful tutorials and reviews to improve your site.